This comprehensive guide walks you through the complete PagerDuty setup process, organized into 10 steps. We’ve structured the guide to match your team’s growth journey—starting with essential configurations for small teams, advancing to robust solutions for growing teams, and wrapping up with enterprise-grade features for large organizations. By the end, you’ll have a fully operational incident management system set up on PagerDuty tailored to your specific needs.
Introduction
Back in the day, Toyota tackled incident management with an Andon Cord—a simple rope that allowed any worker to instantly alert the team when there was an issue.
Fast forward to today, we have incident management tools like PagerDuty play a similar role, connecting monitoring tools, alerting the right people, and streamlining incident response workflows.
However, the initial PagerDuty setup can be overwhelming with its numerous features and configuration options. But don’t worry, we’ve got you covered.
This guide breaks down the PagerDuty setup process into three manageable levels:
- Steps 1-3 cover essential configurations like services, monitoring tool integrations, and basic escalation policies for small teams
- Steps 4-7 address the needs of growing teams, including comprehensive oncall schedules, advanced alert rules, and mobile access
- Steps 8-10 focus on enterprise-level features such as team structures, advanced automation, and analytics for large organizations
By following this guide, you’ll create a PagerDuty environment tailored to your team’s specific needs. And if you find the PagerDuty setup process too complex, we’ll also introduce you to Spike, a simpler and affordable alternative that might better fit your requirements.
Beginner Level: Essential Setup (Small Teams)
For small teams just getting started, the first three steps cover the fundamental PagerDuty setup that will get you operational quickly. Focus on these basics to establish a solid foundation before exploring more advanced features.
Step 1: Setting Up Services in PagerDuty

Services in PagerDuty represent the applications, systems, or components you want to monitor for incidents.
They act as containers that organize related alerts and determine how notifications are processed.
Each service can be connected to specific monitoring tools, have its own escalation policy, and maintain a separate incident history—making them the fundamental building blocks of your PagerDuty setup.
To set up your first service:
- Navigate to Services and click + New Service
- Provide a clear, descriptive name for easy identification
- Add a brief description explaining the service’s role
- Choose basic incident settings to keep it simple initially
💡Pro Tip: Use consistent naming conventions across services. Clear names help responders quickly identify affected systems during an incident.
Step 2: Integrating Monitoring Tools in PagerDuty
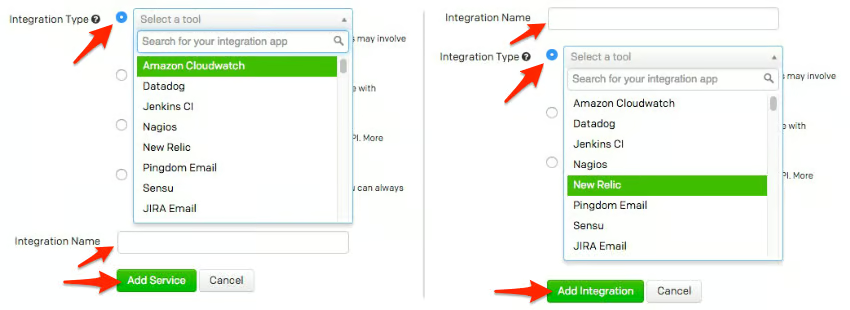
Once your service is created, you’ll need to connect it to your monitoring tools to receive alerts.
This integration forms the critical bridge between your monitoring systems and PagerDuty, allowing alerts to flow automatically to the right people when issues arise.
PagerDuty offers native integrations with hundreds of monitoring platforms including Datadog, Prometheus, CloudWatch, and Grafana through simple integration keys or webhook URLs.
To integrate your monitoring tool:
- Open your service and select the Integrations tab
- Choose the monitoring tool you want to connect (Datadog, Prometheus, etc)
- Copy the Integration URL or key provided
- Configure your monitoring tool to send alerts to this URL
- Test the integration by triggering a test alert
Once configured, this bidirectional connection automatically creates PagerDuty incidents when problems are detected and resolves them when your monitoring tools confirm the issue is fixed.
Step 3: Creating Basic Escalation Policies in PagerDuty
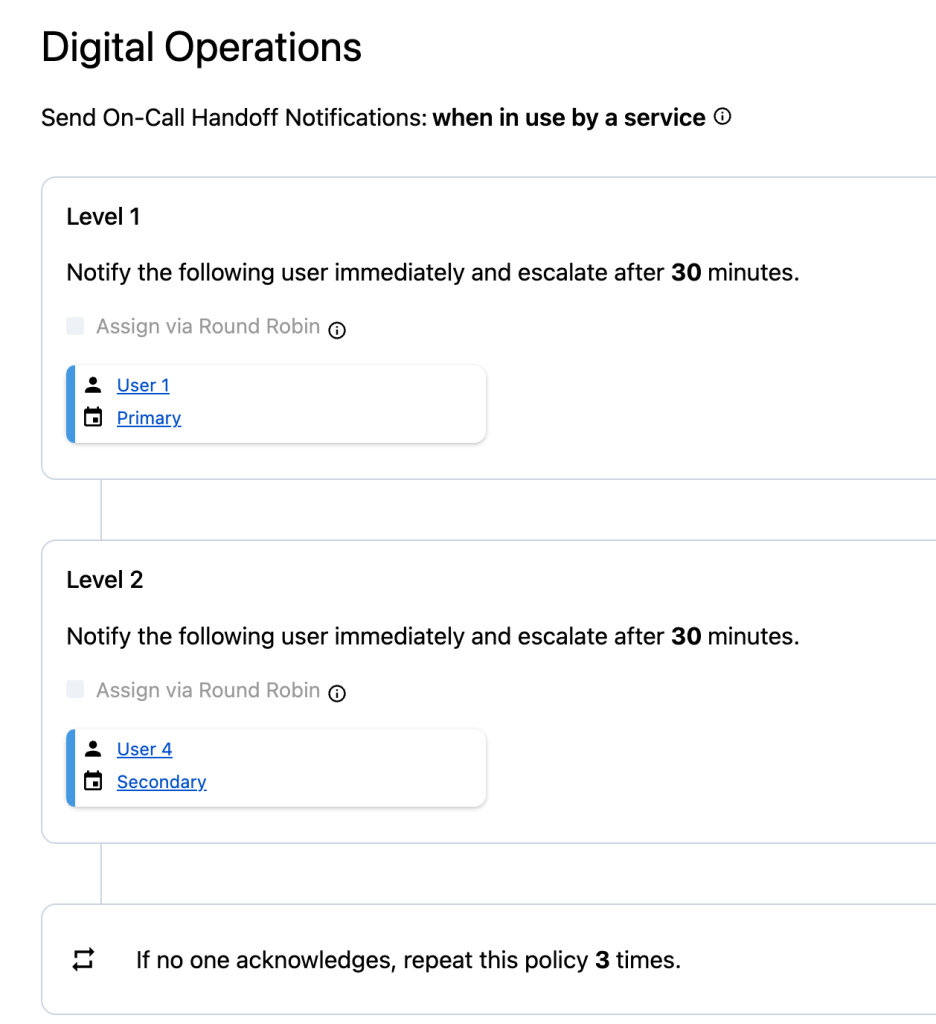
Escalation policies in PagerDuty determine who gets notified when incidents occur and what happens if nobody responds. They act as the routing system for alerts, making certain critical issues always reach someone who can take action.
When an incident triggers, PagerDuty alerts the first person or team in the policy. If they don’t respond within a set time, the alert automatically escalates to the next person in line, preventing incidents from being missed or ignored.
Well-designed escalation policies balance rapid response with responder well-being by distributing the oncall burden appropriately across team members.
To learn more about oncall member well-being, check out this blog post: Work life balance for Oncall members
To create a basic escalation policy:
- Go to People → Escalation Policies and click New Escalation Policy
- Name the policy clearly (e.g., Backend Team Escalation)
- Add primary responders who should receive alerts first
- Set escalation intervals (e.g., escalate after 15 minutes)
- Add a second escalation level with backup responders
This escalation policy helps alerts reach the right people at the right time, even if the primary responder is unavailable.
With these three foundational steps completed, your small team now has the essential PagerDuty setup needed to handle basic incidents effectively. For growing teams facing more complex challenges, the next steps will help fine-tune your incident response workflows.
Intermediate Level: Advanced Configuration (Growing Teams)
As your team expands and incident complexity increases, you’ll need more sophisticated PagerDuty configurations. These next four steps build upon your foundation to create structured oncall rotations, fine-tune alerts, enable mobile response, and improve stakeholder communications—all critical for growing teams managing an increasing incident load.
Step 4: Building Comprehensive Oncall Schedules in PagerDuty
Oncall schedules in PagerDuty define exactly who is responsible for responding to incidents during specific time periods.
They create a structured rotation system that distributes the responsibility of handling alerts across team members, providing clear accountability while preventing burnout.
A well-designed oncall schedule establishes predictable patterns of responsibility, allowing team members to plan their work and personal lives around their oncall shifts.
To learn how to balance oncall duties and personal well-being, check out this blog post: The 24/7 On-Call Dilemma: Balancing Incident Response with Personal Time
To build a comprehensive oncall schedule:
- Navigate to People → Schedules and click Create Schedule
- Name your schedule and select a time zone
- Choose a rotation type: daily, weekly, or custom
- Add team members to the rotation and set their shifts
- Create multiple layers for primary and backup coverage
- Use overrides to handle temporary changes, like vacations or holidays
💡 Pro Tip: For global teams, set up the follow-the-sun oncall model. This rotates oncall responsibilities across time zones, providing continuous incident coverage.
To explore more oncall models, check out this blog post: 5 Best On-Call Models for Effective Rotation
Step 5: Implementing Advanced Alert Rules in PagerDuty
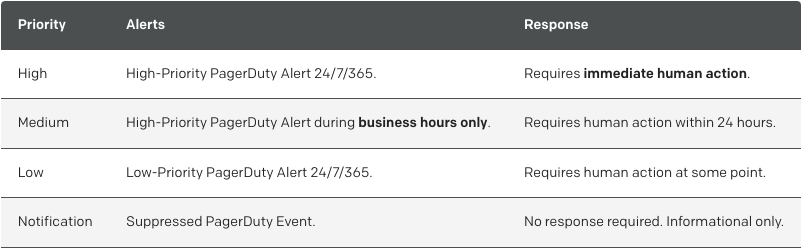
Alert rules in PagerDuty help you filter, categorize, and route incoming alerts based on their content and urgency.
Without proper alert rules, teams often face alert fatigue—a condition where responders become desensitized to notifications due to excessive or irrelevant alerts.
PagerDuty lets you set severity levels to prioritize critical incidents. You can also use alert grouping to combine related alerts into a single incident, preventing redundant notifications.
To route critical incidents to a dedicated escalation policy with faster response times:
- Navigate to Services → select your service → Integrations tab
- Click on Event Rules and select Create Event Rule
- Set a condition like “If summary contains ‘Critical’ or ‘Severe'”
- Under actions, select “Route to a specific escalation policy”
- Choose your dedicated critical incident escalation policy
- Set the incident urgency to “High” to trigger immediate notifications
- Save your rule and test by sending a critical alert through your monitoring tool
This setup makes sure critical incidents follow a faster escalation path (e.g., 5-minute escalations) compared to your standard incidents (e.g., 15-minute escalations).
To reduce alert noise by combining related incidents:
- Go to your service settings and find the Alert Grouping section
- Select Intelligent Alert Grouping (uses machine learning to group similar alerts)
- Set your grouping time window (PagerDuty recommends starting with 5 minutes)
- Save your settings and monitor the effectiveness
- To improve grouping accuracy, manually merge related incidents that weren’t automatically grouped
- Select multiple incidents from your incidents dashboard and click “Merge Incidents”
- After 5-10 manual merges, the system will learn and improve its grouping patterns
With these configurations, your critical alerts will reach the right people faster, while related alerts will be consolidated to reduce notification fatigue and help your team focus on resolving the underlying issues rather than managing multiple related incidents.
Step 6: Mobile Access and Remote Management
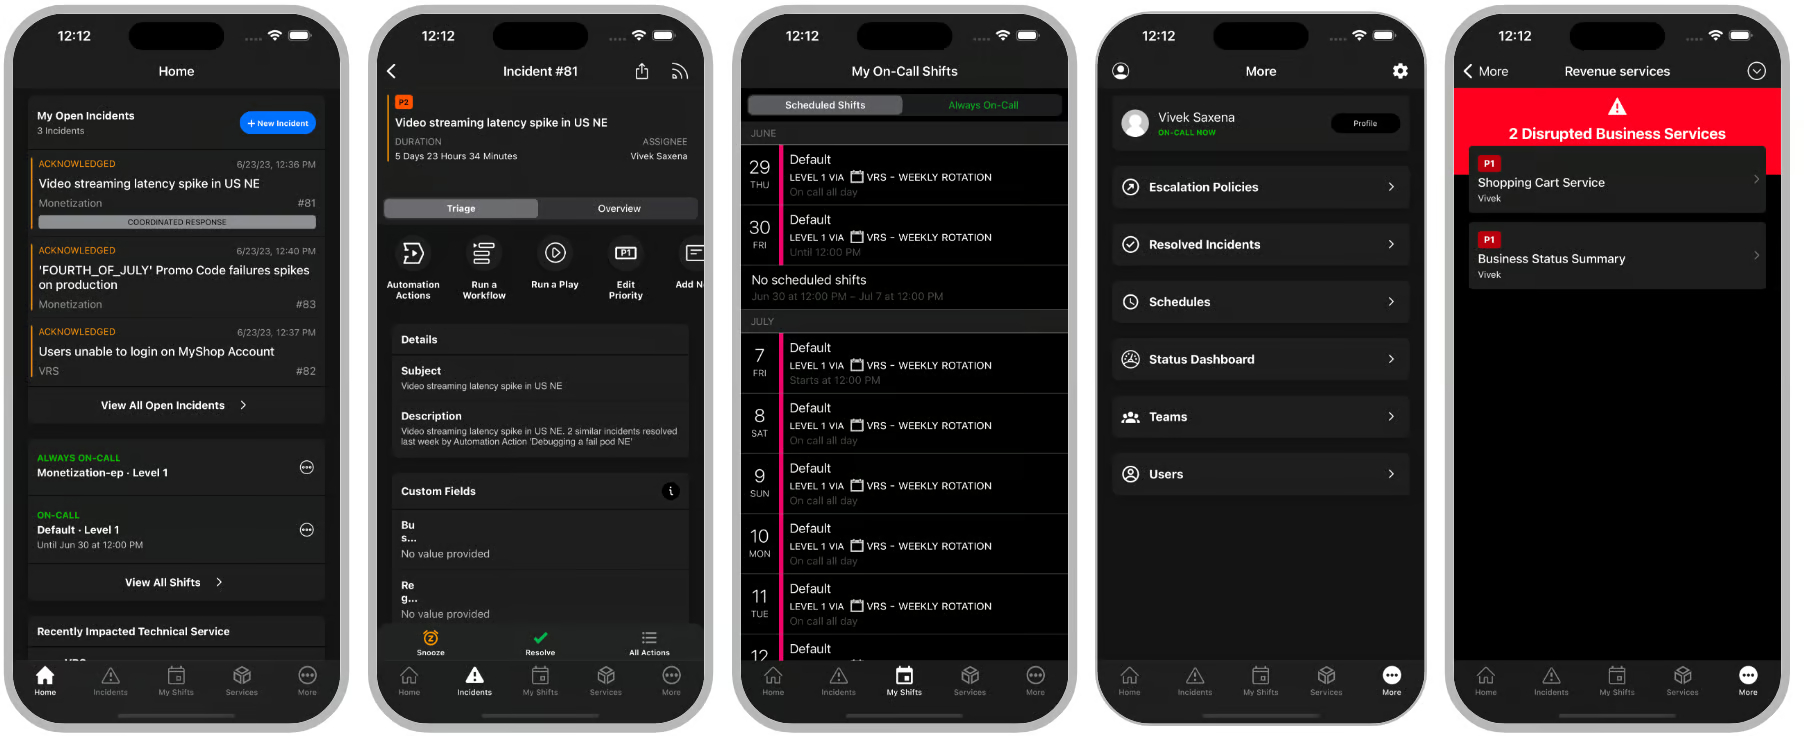
The PagerDuty mobile app extends incident response capabilities beyond the desktop, allowing your team to manage critical issues from anywhere.
The app delivers real-time notifications through push alerts, SMS, and phone calls when you’re away from your desk.
With just a few taps, you can acknowledge, resolve, or escalate incidents, view oncall schedules, and access incident details on the go.
To set up mobile access:
- Download the PagerDuty mobile app from the App Store or Google Play
- Log in with your PagerDuty credentials
- Configure notification sounds and push alert preferences
- Set up notification rules specific to the mobile app
- Test mobile incident acknowledgment and resolution workflows
Mobile access lets your team respond to incidents from anywhere—whether commuting, at lunch, or away from the office—reducing response times and improving service reliability.
Step 7: Setting Up Status Pages in PagerDuty
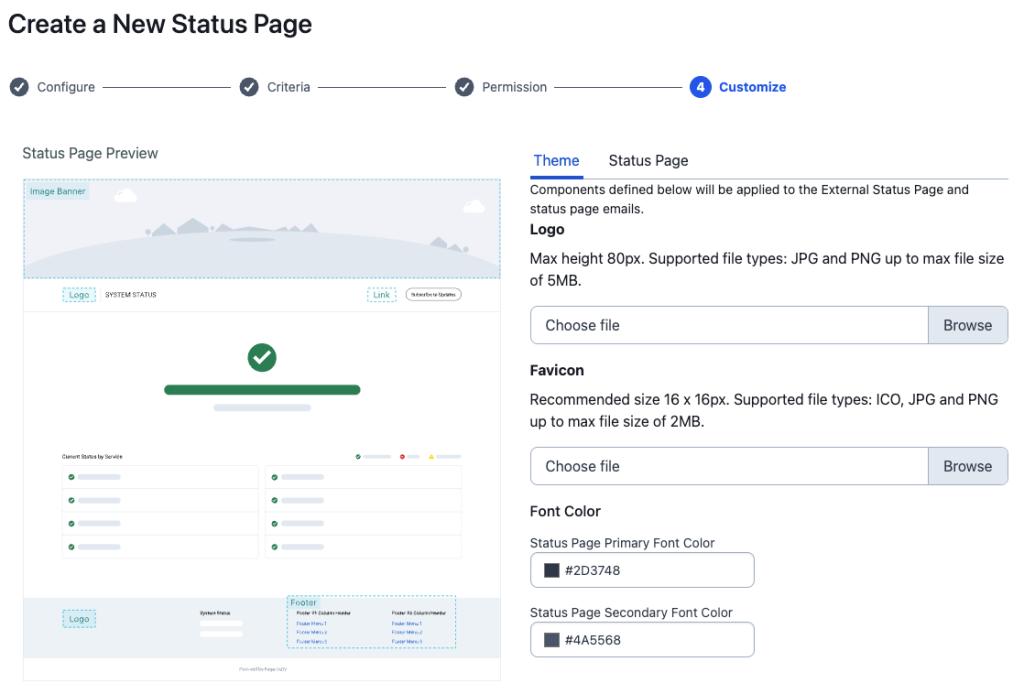
Status pages keep stakeholders and customers informed during service disruptions or planned maintenance.
They provide real-time updates about your services, reducing the need for manual communication and freeing your team to focus on resolving incidents.
A good status page shows which services are impacted, what actions are being taken, and when normal operations will resume—building transparency and trust with users.
To set up a status page:
- Navigate to Status Pages and click New Status Page
- Name your status page and customize its appearance
- Add the services you want to display on the status page
- Configure subscriber notifications for status updates
- Set up templates for common incident communications
- Connect your status page to your company domain for a professional look
💡 Pro Tip: Don’t limit status pages to incidents alone—use them to communicate maintenance windows as well. This keeps stakeholders informed and reduces unnecessary support inquiries.
With these configurations, growing teams can handle incidents more efficiently. For enterprises with complex structures, the next steps focus on scalability and advanced automation.
Pro Level: Enterprise Configuration (Large Organizations)
For large organizations with multiple teams and complex operational structures, PagerDuty offers enterprise-grade features to manage incidents at scale. These final three steps focus on implementing team hierarchies, leveraging automation for faster resolution, and using analytics to drive continuous improvement.
Step 8: Implementing Team Structures and Permissions in PagerDuty
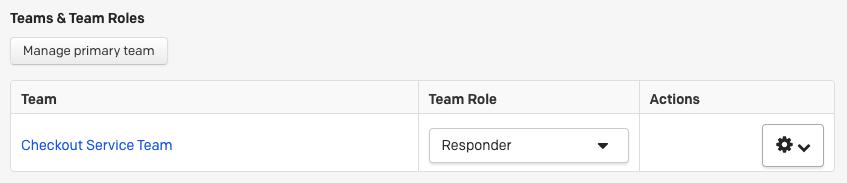
For enterprise-scale operations, organizing teams and setting permissions maintain clarity and control across departments.
Also, creating team silos where necessary helps teams manage their own services, schedules, and escalation policies independently. This reduces noise and directs alerts to the relevant team.
However, silos should be balanced with cross-team visibility for major incidents requiring collaboration.
To implement team structures and permissions:
- Navigate to Configuration → Teams and click Create Team
- Assign a clear team name and description for easy identification
- Add team members and define their roles: Admin, Manager, or Responder
- Configure service visibility so teams only see relevant services
- Set up permissions to control access levels across departments
This hierarchical approach allows enterprise organizations to maintain security while giving teams the autonomy they need to manage their own incident response processes.
Step 9: Advanced Automation and Integrations in PagerDuty
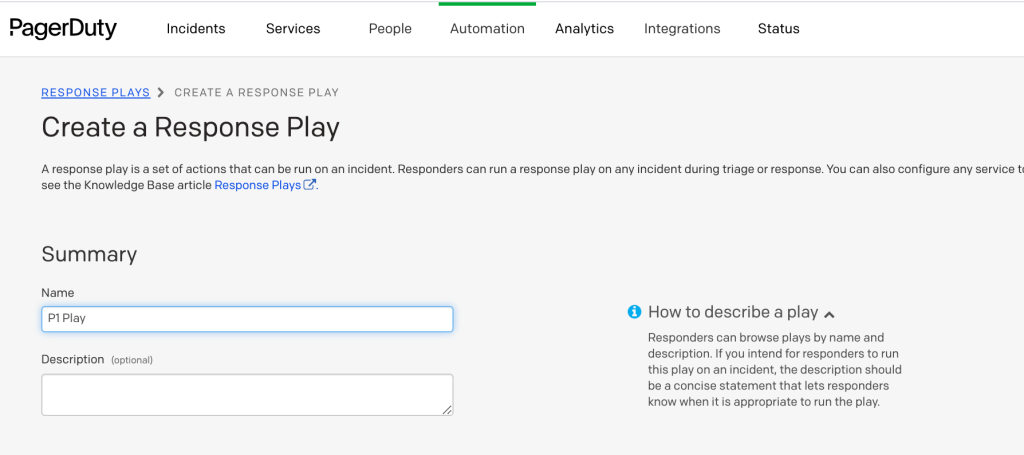
Automation eliminates repetitive tasks during incidents, allowing responders to focus on resolution.
PagerDuty offers tools like Response Plays, Event Rules, Webhooks, and API integrations to standardize workflows and route alerts intelligently.
To set up automation:
- Create Response Plays to automate common incident actions (e.g., notifying stakeholders or assigning tasks)
- Use Event Rules to filter, route, or suppress alerts based on predefined conditions
- Configure custom webhooks to connect PagerDuty with other tools like Slack or Jira
- Explore API integrations for custom workflows tailored to your organization’s needs
By implementing these automation tools, enterprises can reduce response times, minimize repetitive tasks, and focus on resolving critical issues effectively.
Step 10: PagerDuty Analytics and Continuous Improvement
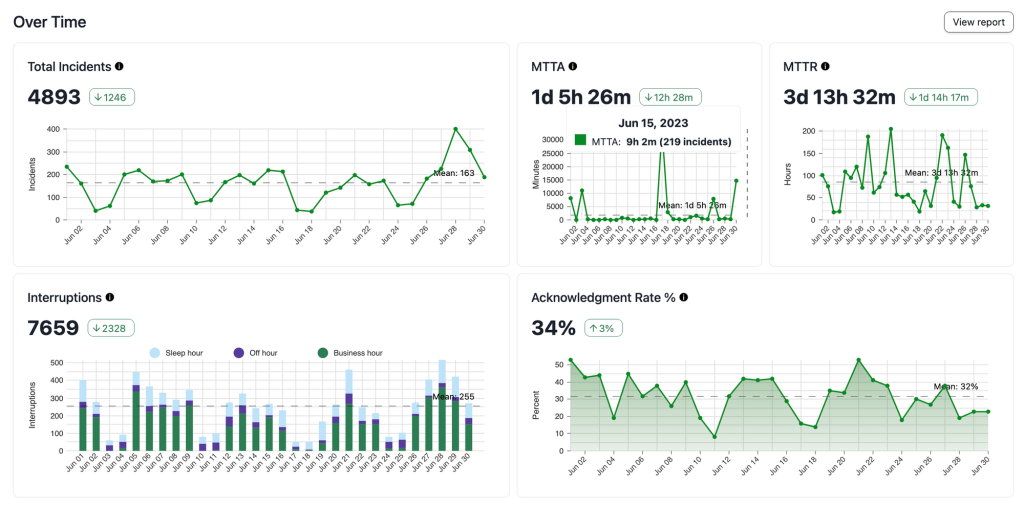
PagerDuty Analytics helps enterprise teams identify bottlenecks and improve their incident management processes over time.
The Analytics Dashboard offers metrics like Mean Time to Acknowledge (MTTA) and Mean Time to Resolve (MTTR), helping teams measure response performance.
User Reporting, part of PagerDuty’s Advanced Analytics suite, goes deeper by showing responder-specific data. This helps identify not just “who” is involved but “what” causes delays in the response process.
To use PagerDuty Analytics effectively:
- Navigate to Analytics → Reports to access key metrics like MTTA and MTTR
- Set up custom reports for specific services or teams
- Use User Reporting to identify individual performance trends and potential bottlenecks
- Conduct post-mortems using analytics data to improve future responses
- Track incident frequency patterns to address recurring issues proactively
With these analytics tools, you can continuously refine your incident management process, reduce resolution times, and improve the overall reliability of your systems.
Spike: A Simpler Alternative to PagerDuty
After exploring the comprehensive PagerDuty setup process, you might be wondering if there’s a more straightforward option available.
Enter Spike—a modern incident management platform that lets teams get started in just 5 minutes.
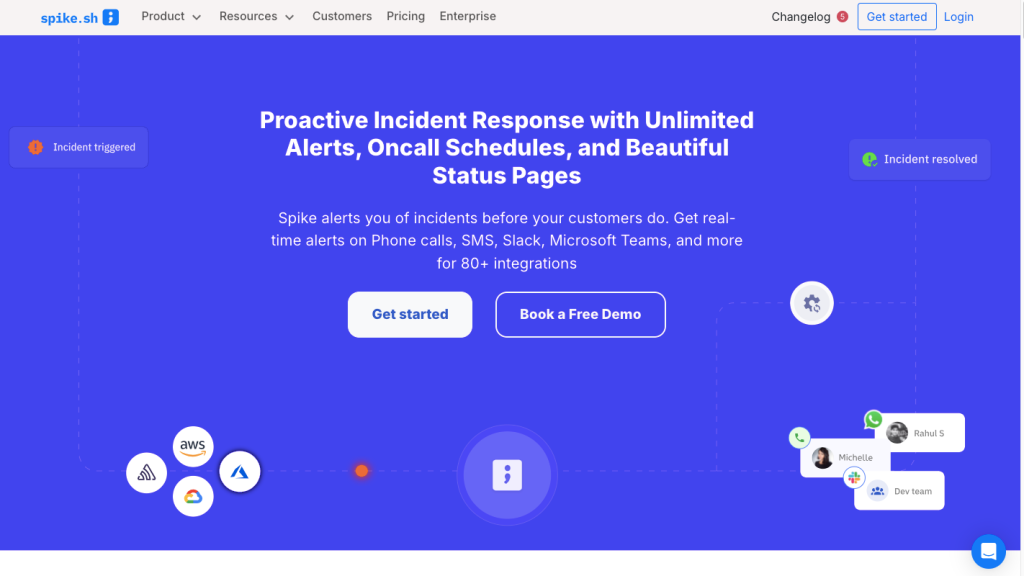
With its clean interface and intuitive features, Spike eliminates the steep learning curve associated with PagerDuty.
Why Choose Spike?
- Offers quick setup with ready-to-use templates.
- Supports multiple alert channels (phone calls, SMS, Slack, Microsoft Teams, WhatsApp, Telegram, Discord, etc) so critical notifications are never missed.
- Offers features like Deep Work mode and Cooldown mode to maintain team well-being.
- Affordable pricing compared to PagerDuty. Spike’s pricing starts at $7/user/month.
Hear what Matt Bird, a Senior Engineer at Neat said about Spike

Ready to simplify your incident management? Try Spike for free today! Experience quick setup, intuitive features, and seamless notifications—all without the complexity. Start your free trial now—no credit card required.
Conclusion
Setting up PagerDuty doesn’t have to be daunting when approached step by step. This guide walked you through the PagerDuty setup in three tiers:
- Beginner steps for small teams needing essential configurations
- Intermediate steps for growing teams requiring more robust solutions
- Advanced steps for enterprises managing complex environments
PagerDuty offers powerful features, but not every organization requires that level of complexity.
If you prefer simplicity and quick implementation, try Spike and get started in 5 minutes with an intuitive interface.