Changelog

All new releases and improvements to Spike

Welcome to the new Spike

We rebuilt the Spike app with a new design, faster navigation, and keyboard shortcuts throughout.

Read the full story in our blog post →

Here is everything that changed.


Incidents page

When you log in, you now land directly on the incidents list. The Home tab is renamed to Incidents.

The header is re-organized around what you need most:

  • Your on-call status, which is visible on every page
  • Create Incident button (Click it or press C to create one manually)
  • Invite team members button
  • Out-of-office mode

Cooldown and Deep Work modes are deprecated.
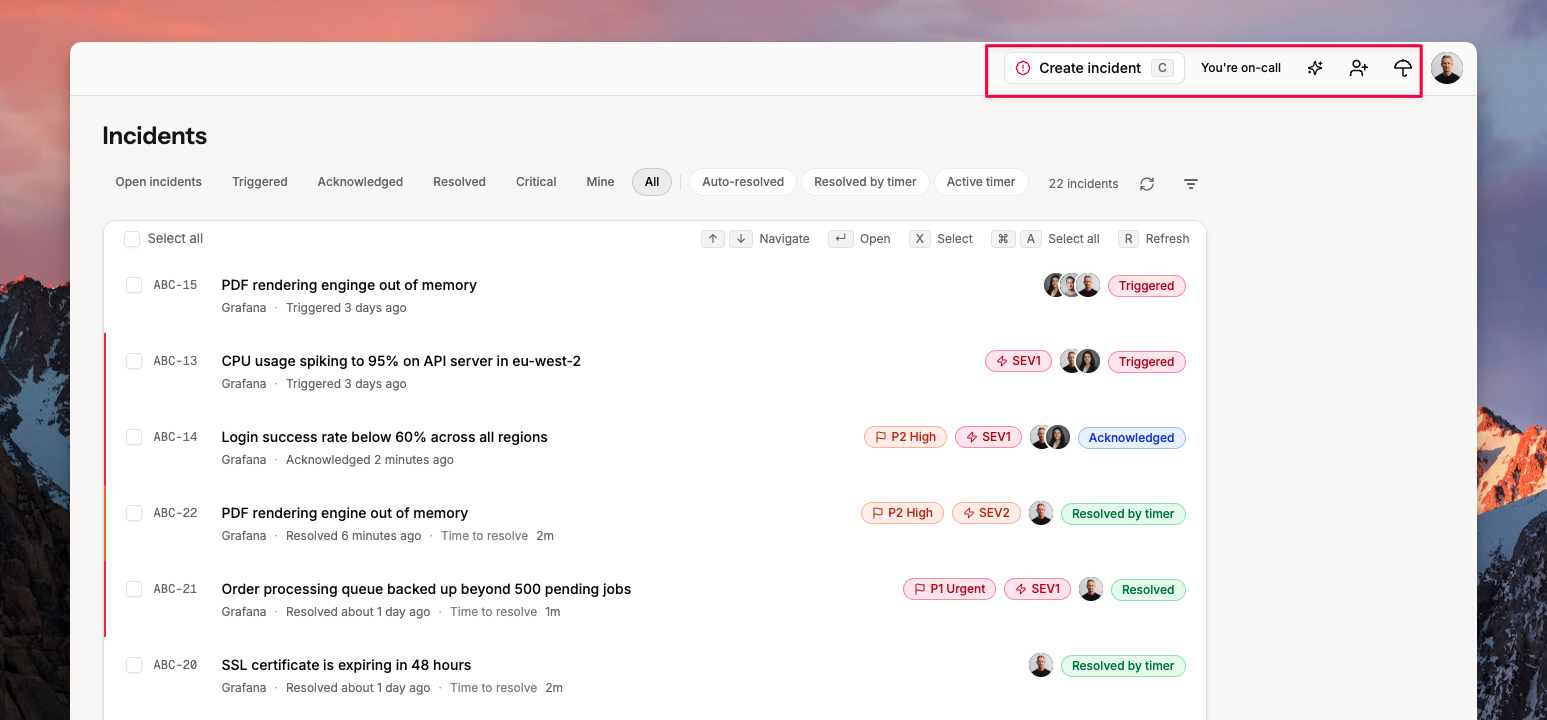

Incidents list

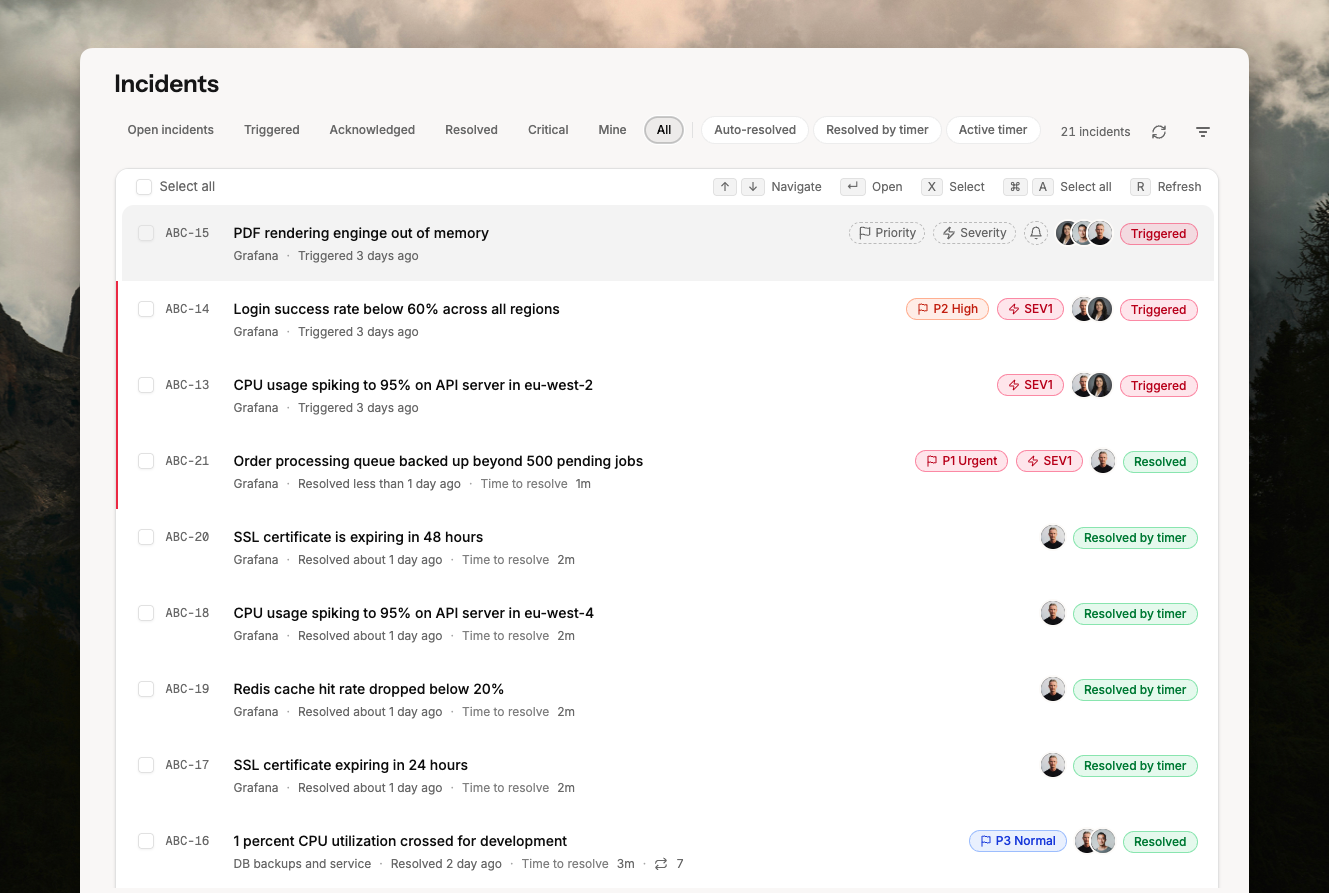
The incidents table is redesigned for faster triage.

  • Click a row to open an incident, or move between rows with the up and down arrow keys.
  • Select and deselect rows with X or Shift+Down.
  • Press Command+K on selected incidents to run status, priority, severity, mute, and manage responders’ actions.
  • Bulk-acknowledge, resolve, and add/remove responders. Change priority or status from the keyboard or action buttons.
  • Manage responders, status, mute, priority, and severity directly from a row without opening the incident.
  • Press R or use the refresh button to fetch new incidents. Useful while testing integrations.
  • New filters include: assigned to you, critical only, has a resolution note, and incidents that mention you.

View incidents →


Incidents details page

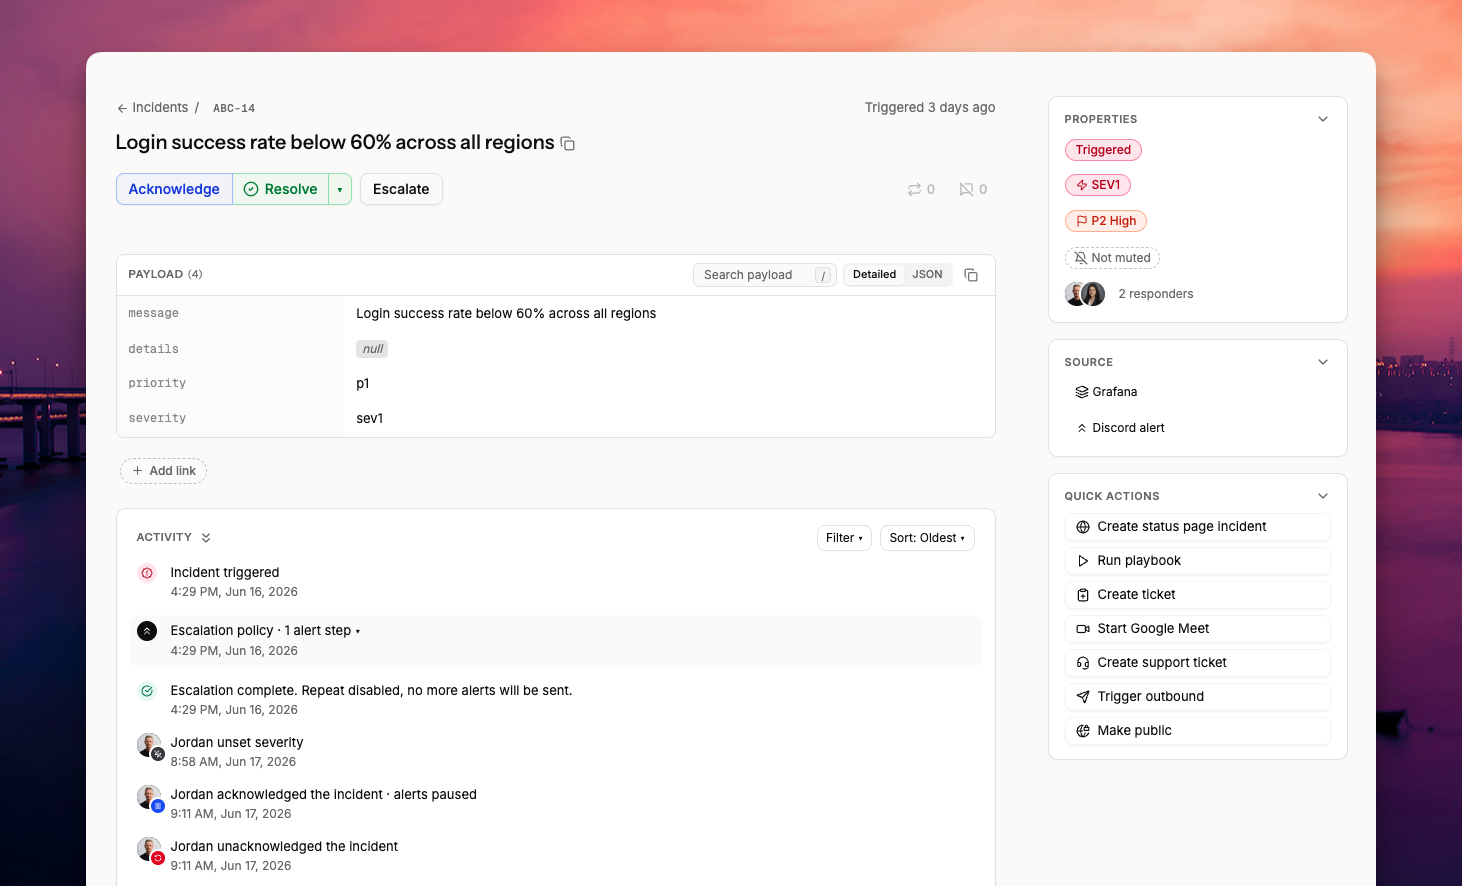
When you open an incident, you'll find a cleaner layout focused on the title and message. All the key actions: acknowledge, unacknowledge, resolve, and escalate are at the top.

  • Add a resolution note and resolve in one action. Or add a note to an open incident and resolve it later.
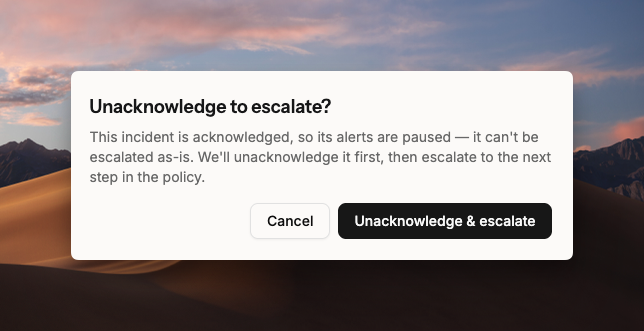
  • Escalating an acknowledged incident now prompts you to unacknowledge and escalate in one click. Acknowledged incidents pause escalation alerts.

Unacknowledge and escalate

  • Improved view of how repeated and suppressed incidents were resolved previously.
  • Quick actions panel: resolve, change severity and priority, jump to the integration or escalation.
  • Create a status page incident with a custom message, make the incident public, start a conference call, or create a Linear or Jira ticket.
  • The payload view is redesigned. Copy any key, search with /, view as JSON, and copy the full payload. You can also add links to the incident.
  • The activity log has filters and sorting. Escalation alerts are grouped by level so you can see how far an incident escalated.
  • Comments and notes are merged into a single Note. Tag teammates with @name and link incidents with @ID.
  • Press Command+K to run common actions from the incident page.
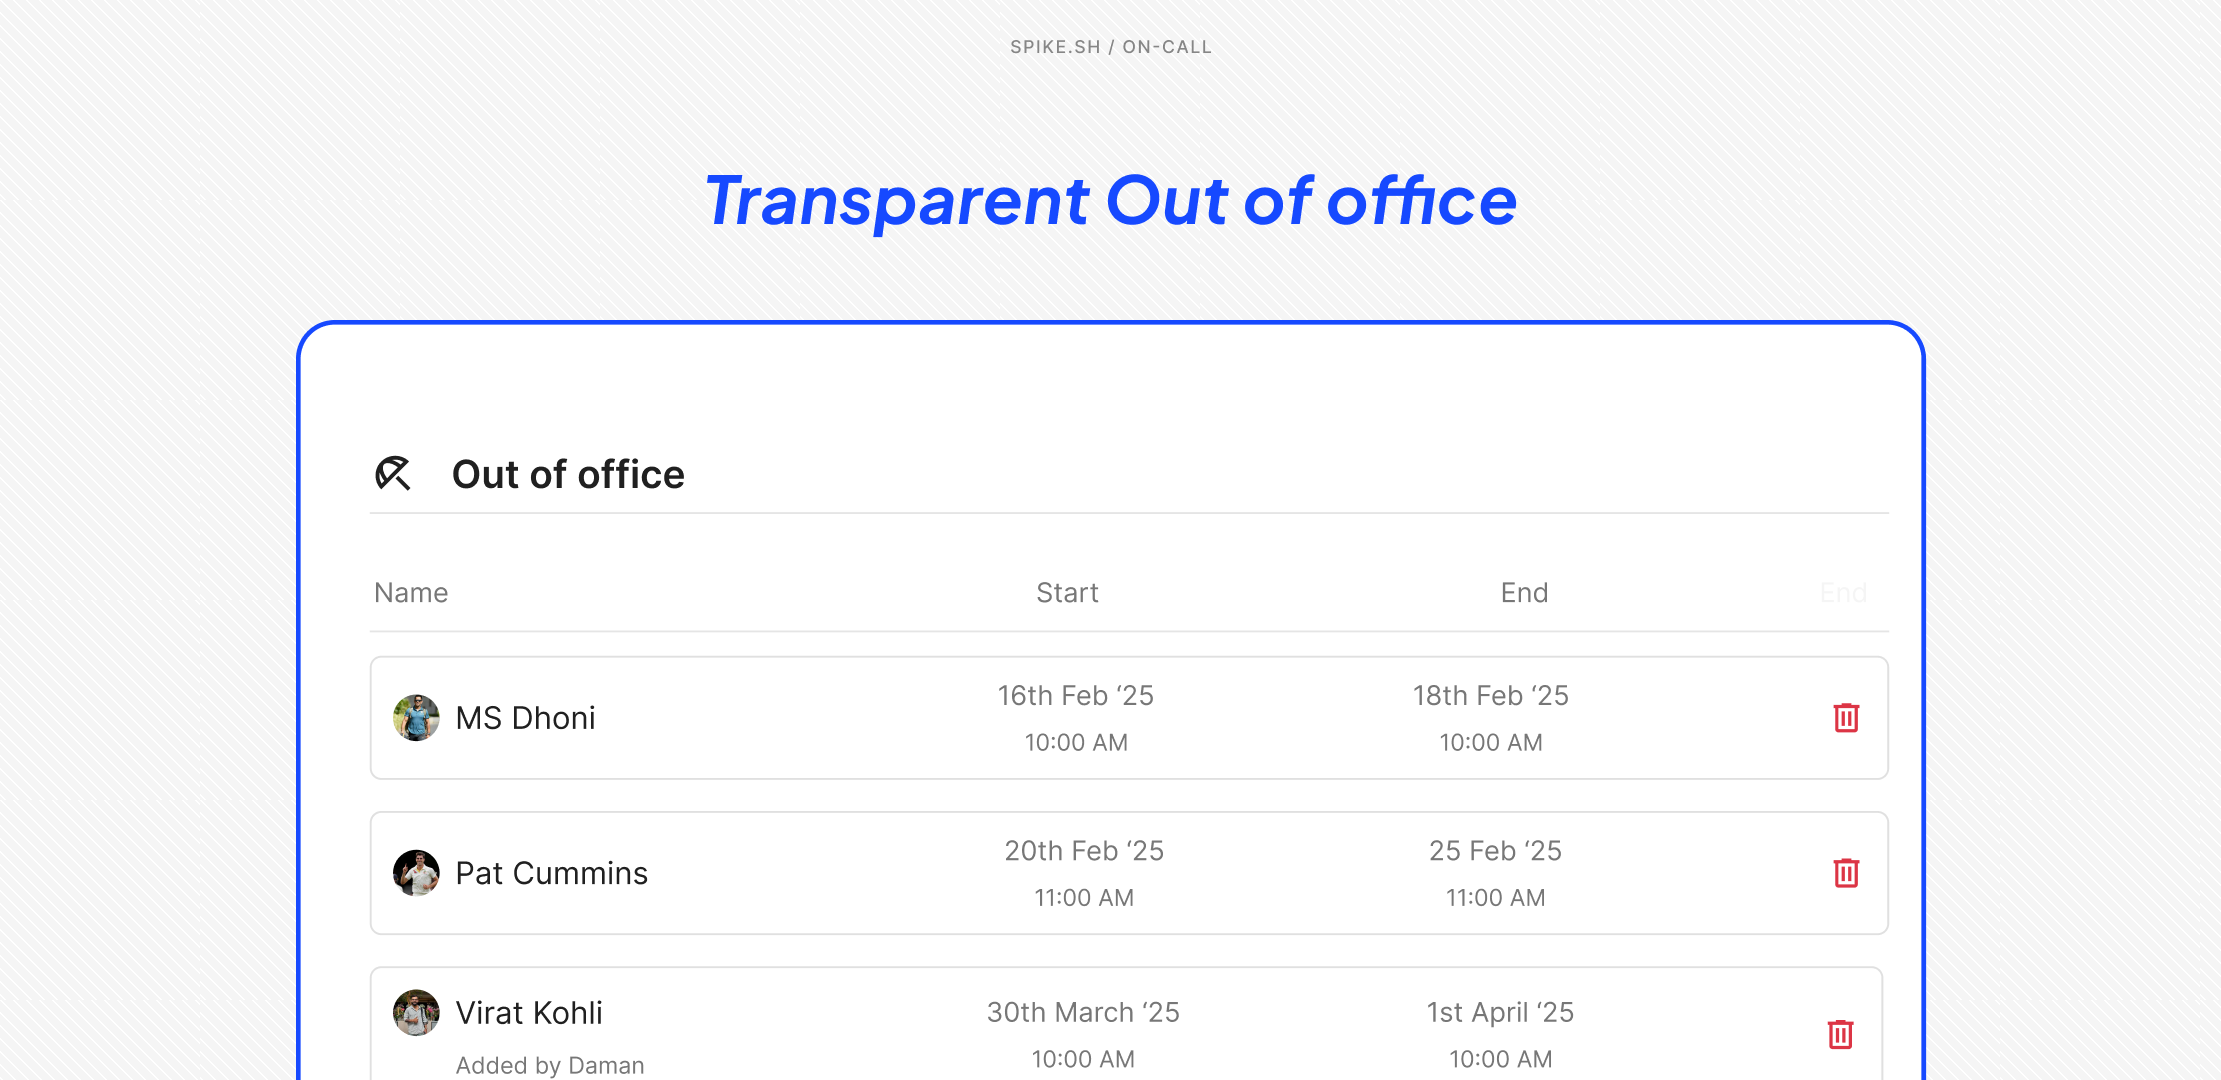
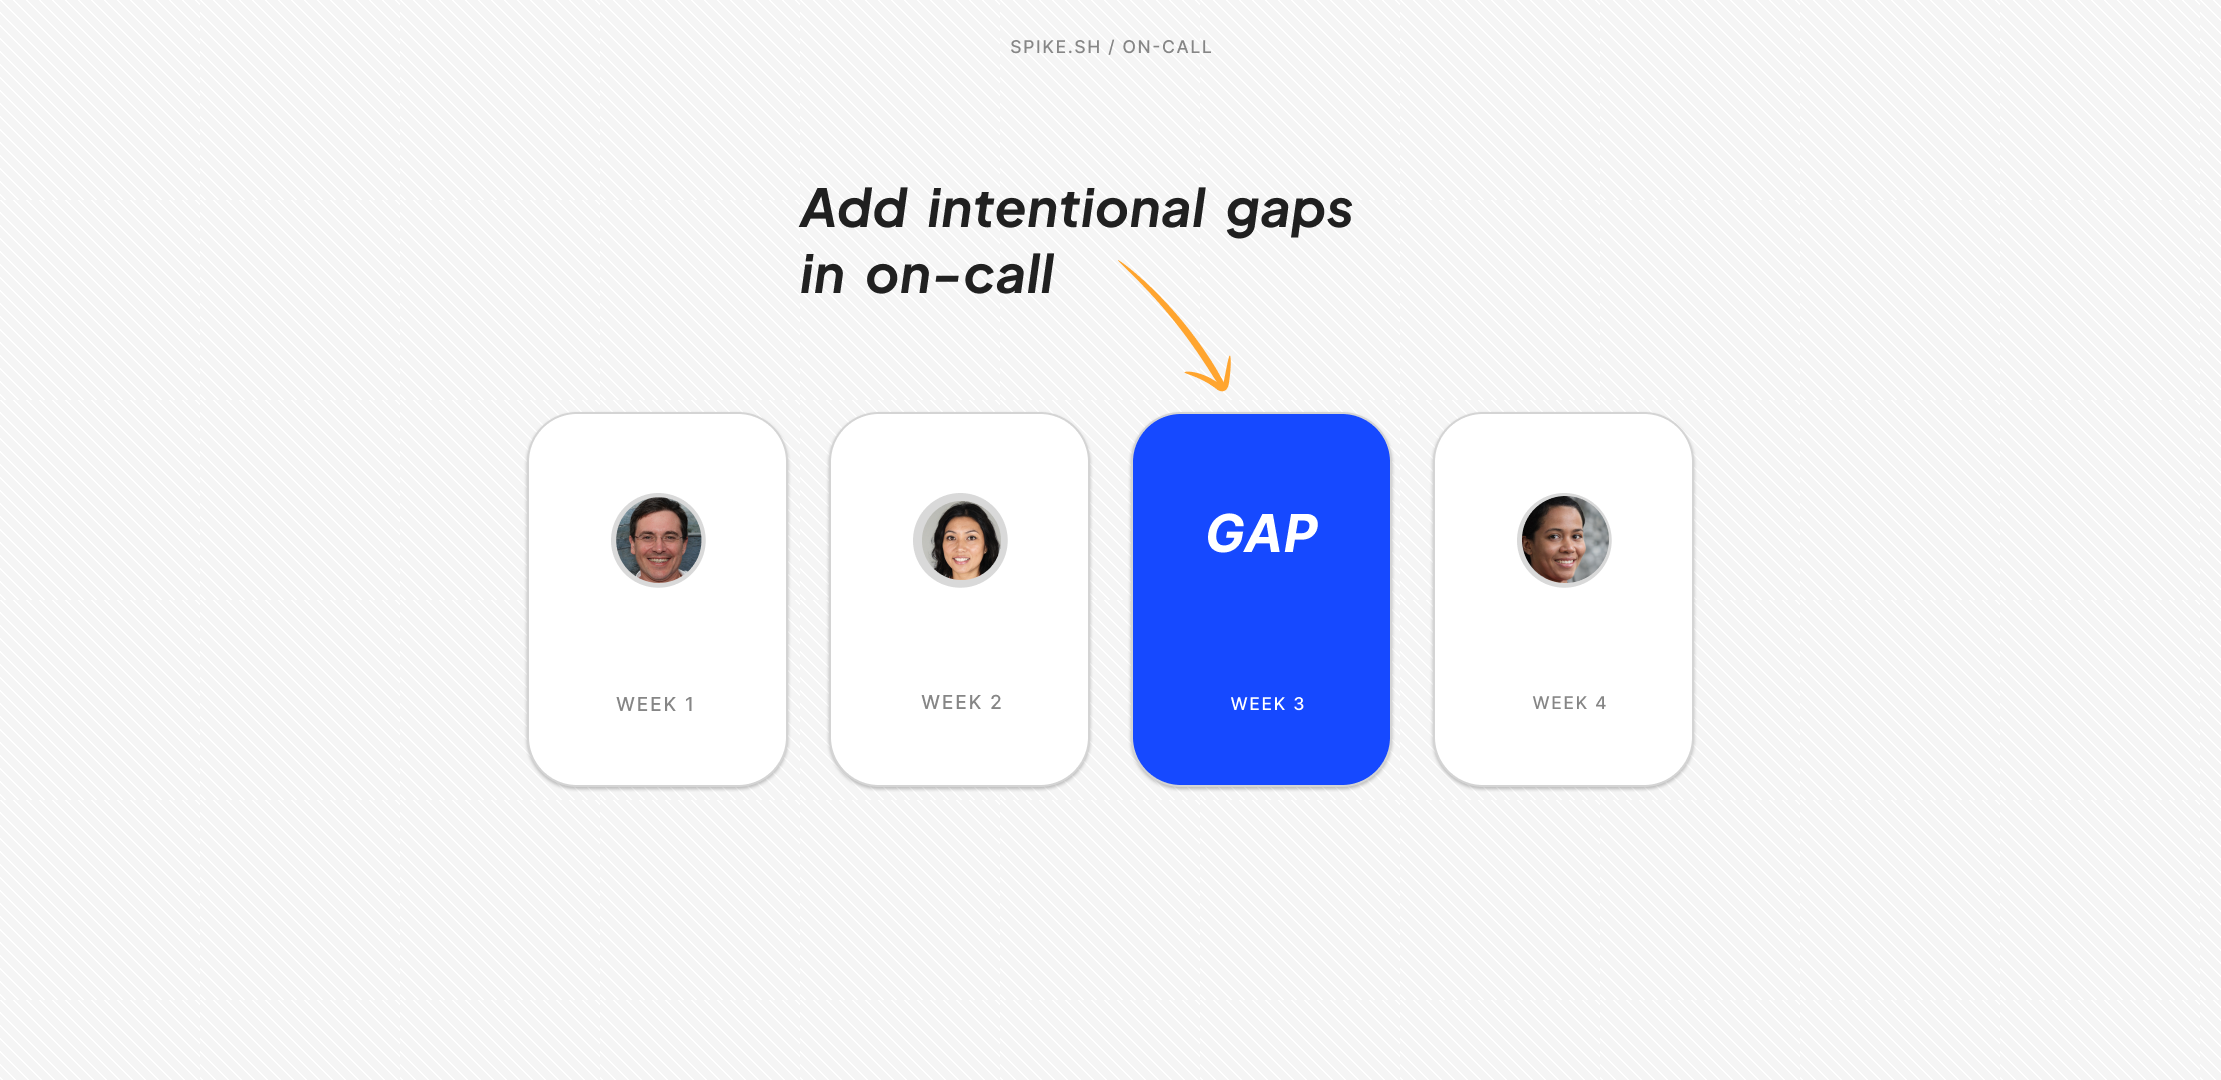
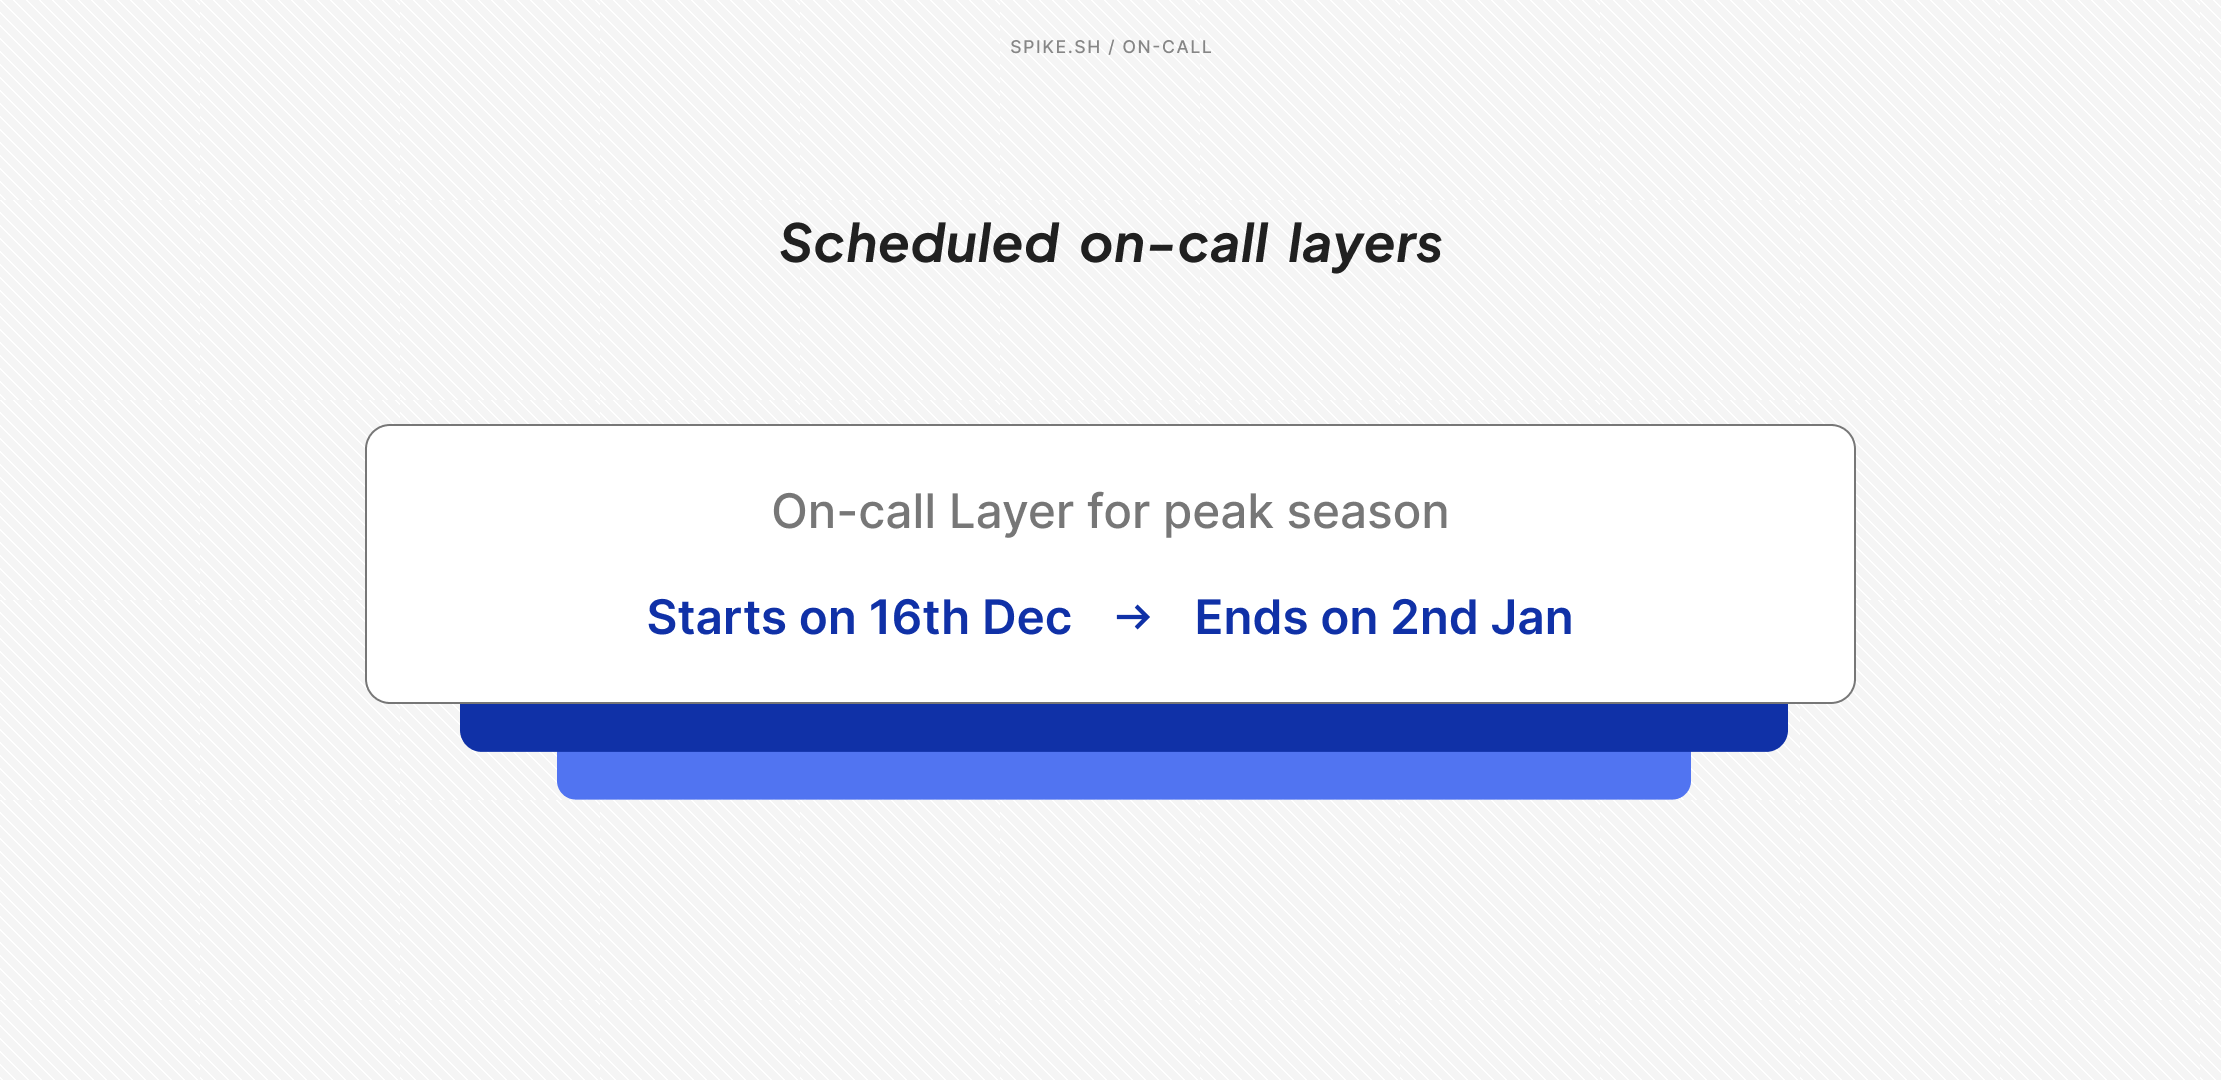
On-call page

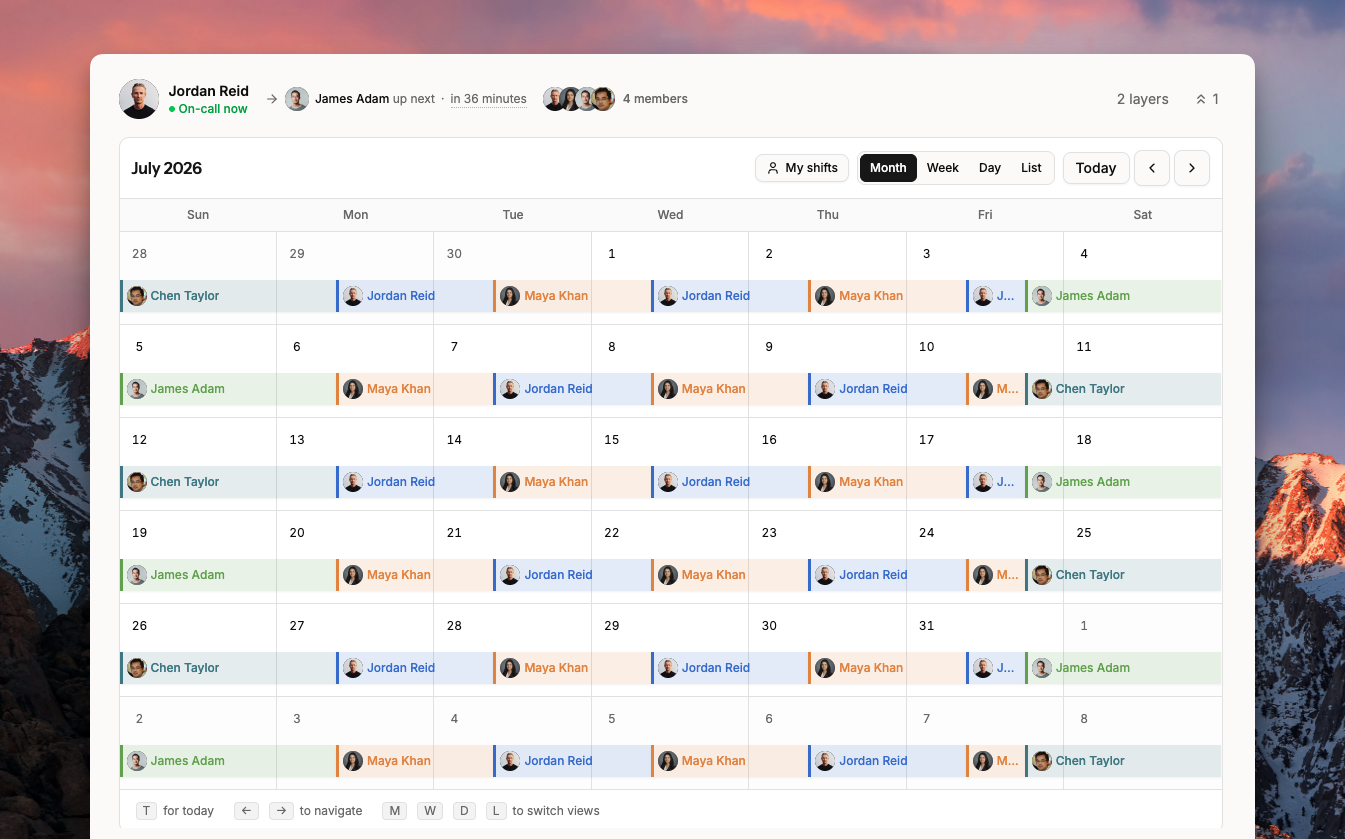
The on-call page puts the calendar front and center. No more scrolling to reach it.

  • Switch between month, week, and day views using keyboard shortcuts.
  • Filter the calendar to show only your shifts.
  • Add overrides by clicking a shift to overwrite it, or drag across empty dates to create one. Remove overrides directly from the calendar.
  • Switch between on-calls with Command+K or by clicking the schedule name.
  • Open All Schedules to see everyone's shifts. Filter by your own shifts or by a specific schedule.
  • Layer configuration is in a compact panel. Open it to view layers, swap members, and reorder.
  • Connected escalations are accessible from the same view.
  • Contact the current on-call member via email or call.
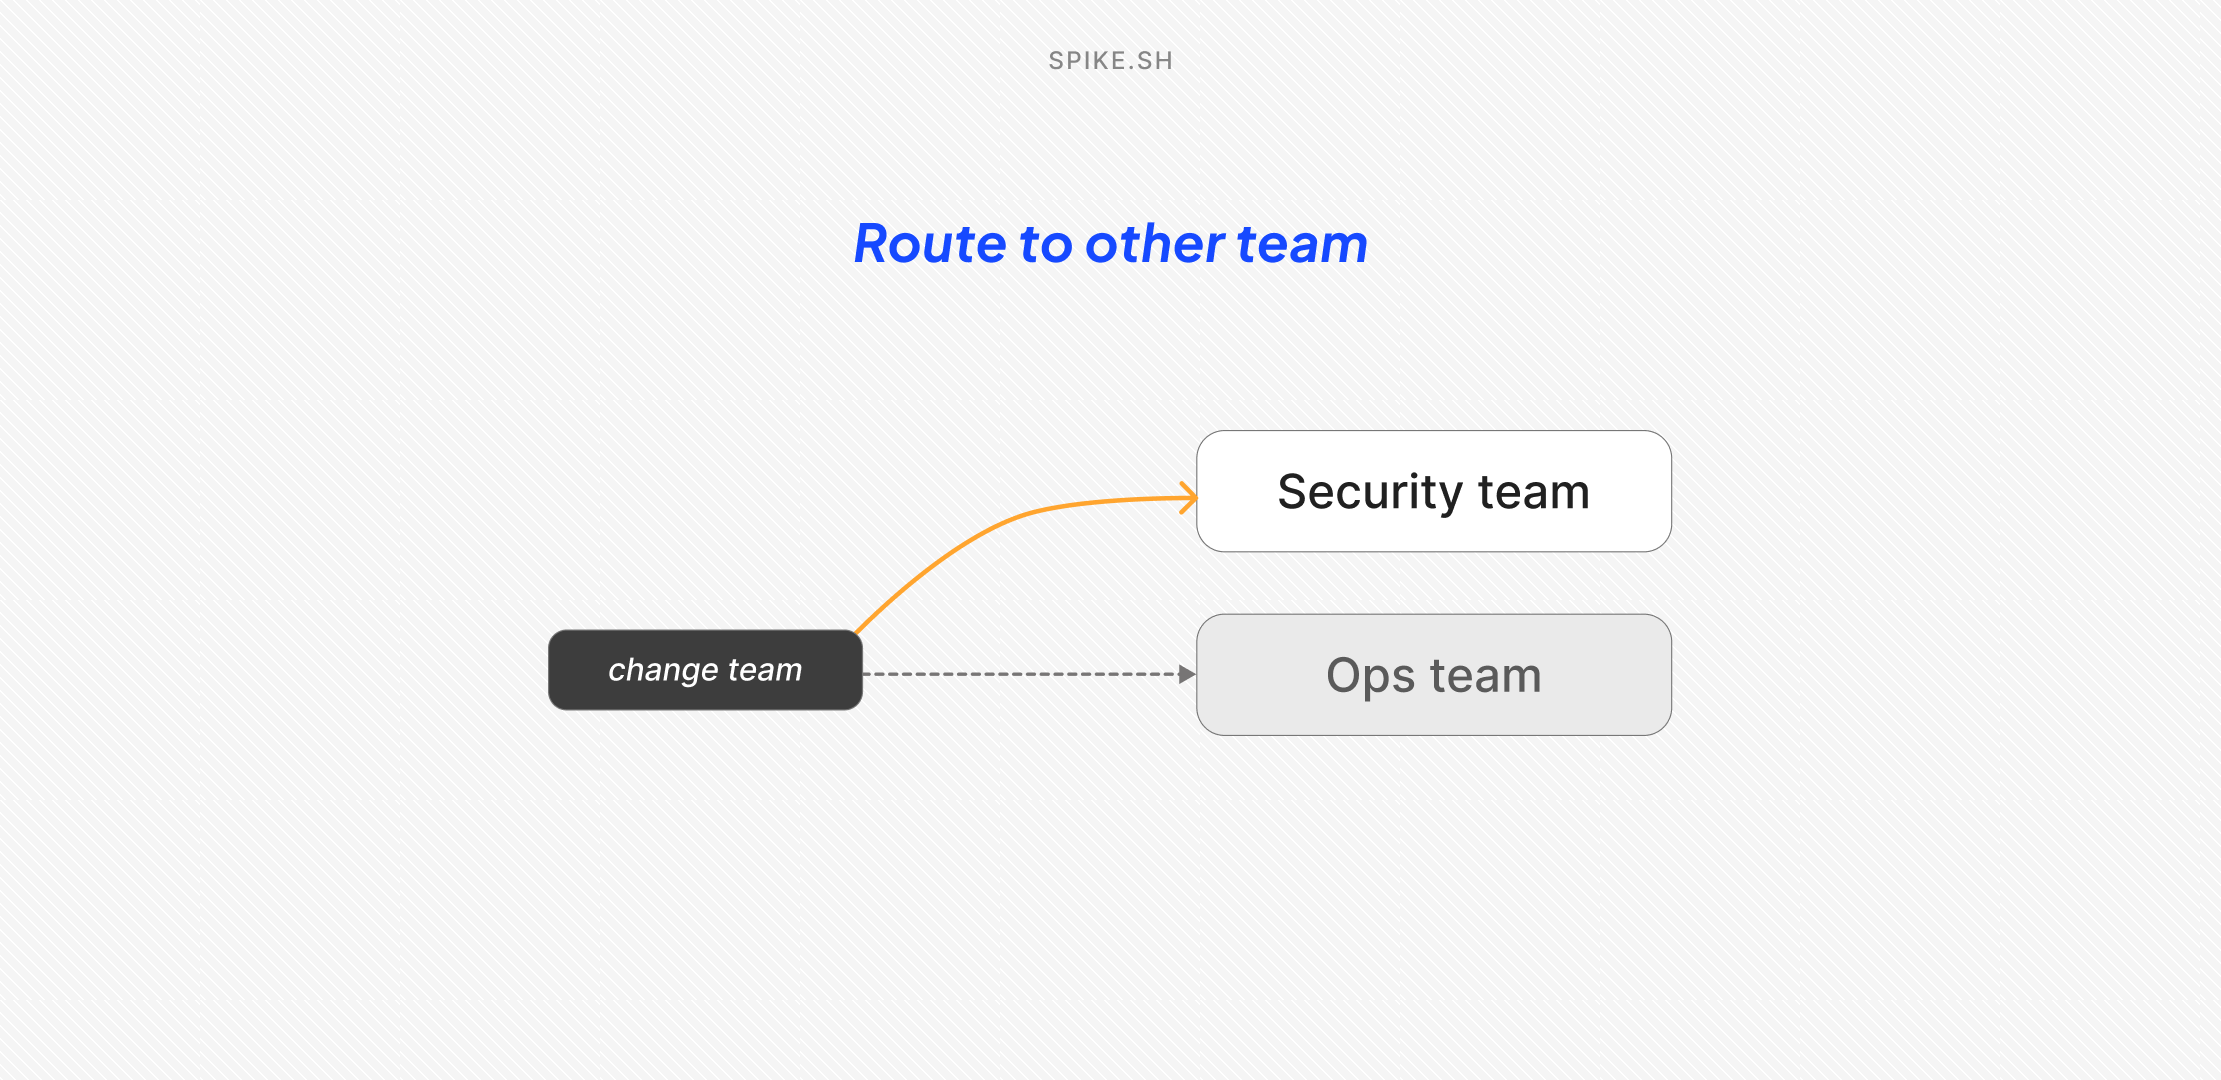
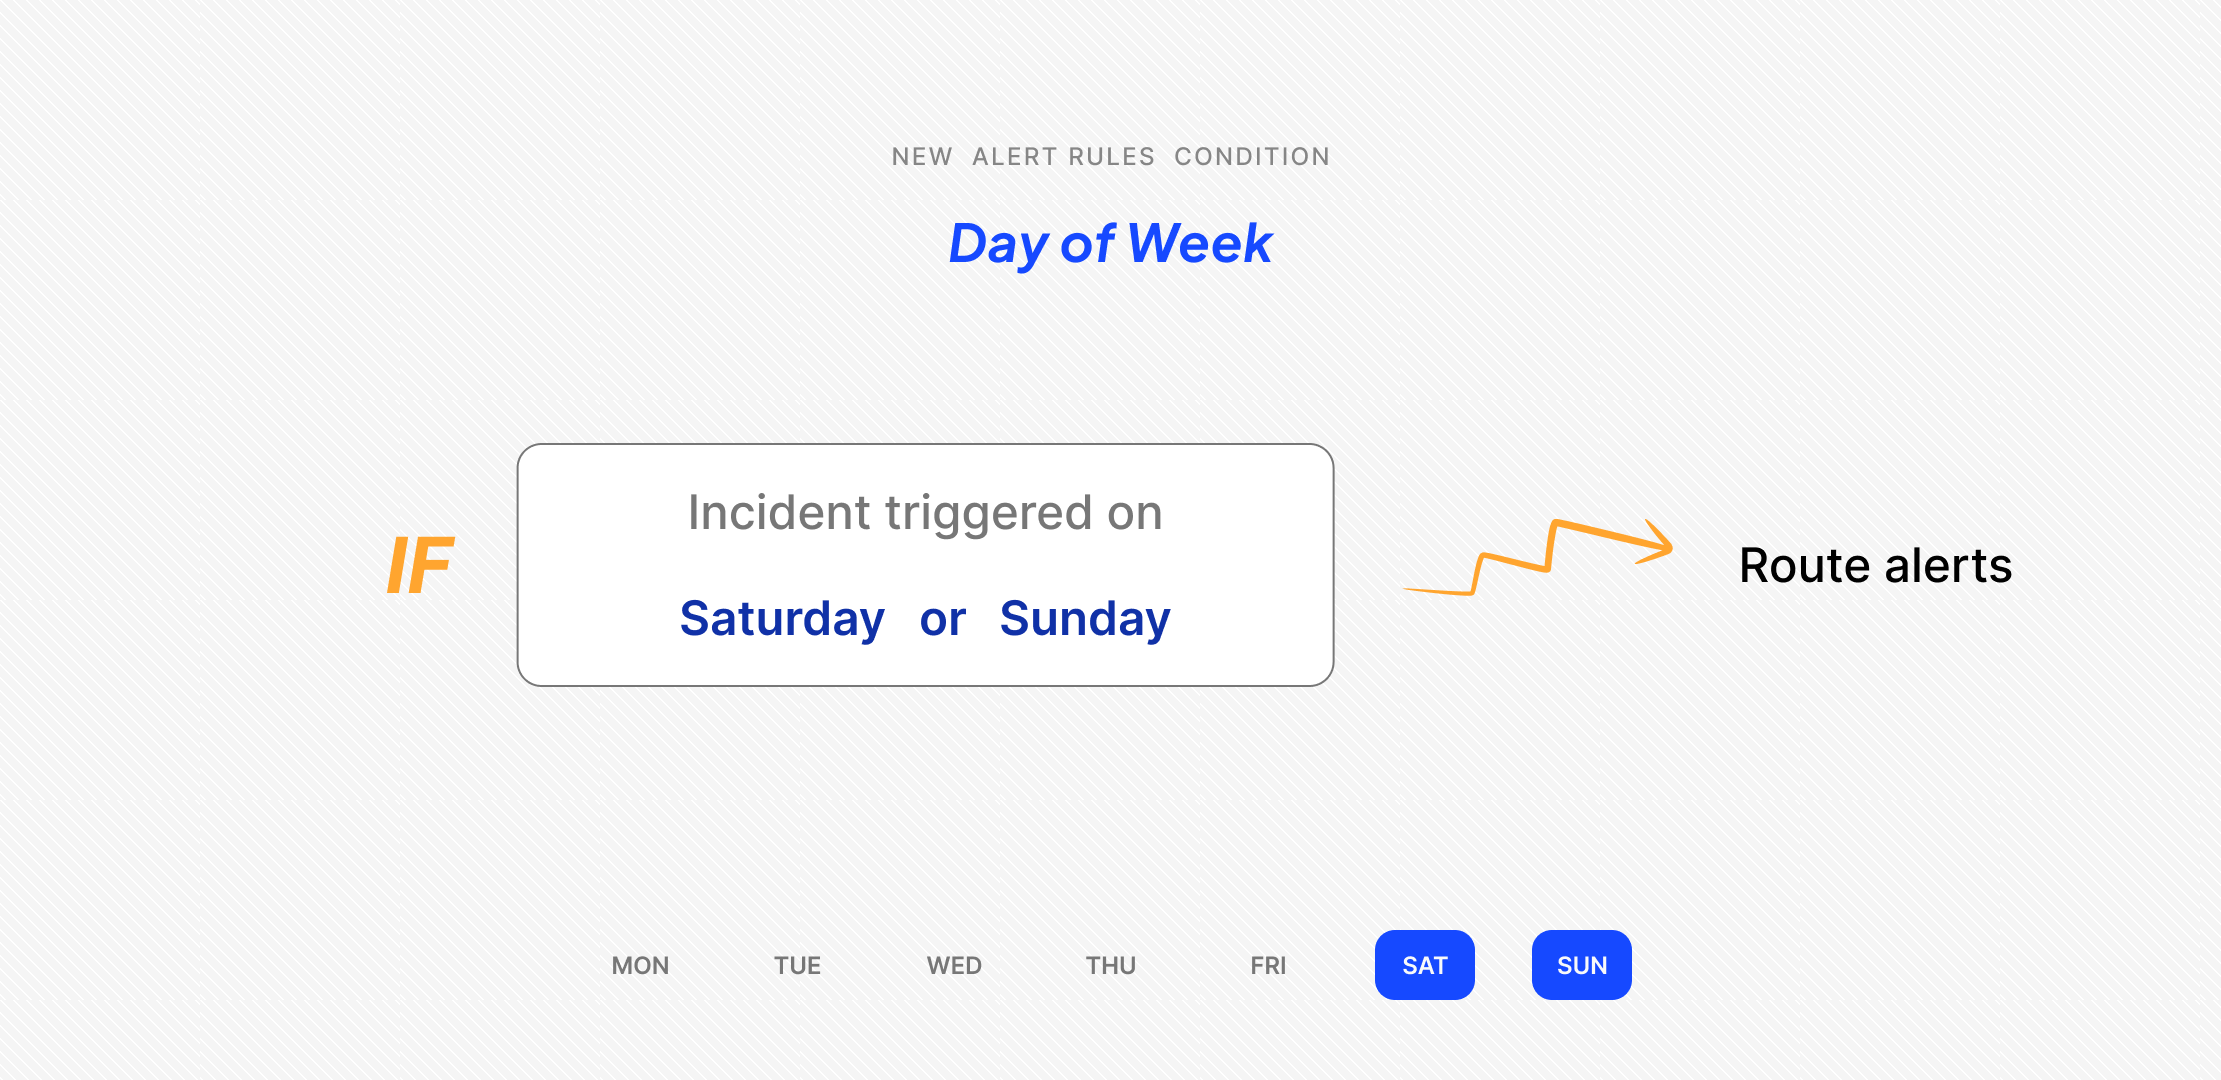
View on-call →


Escalations page

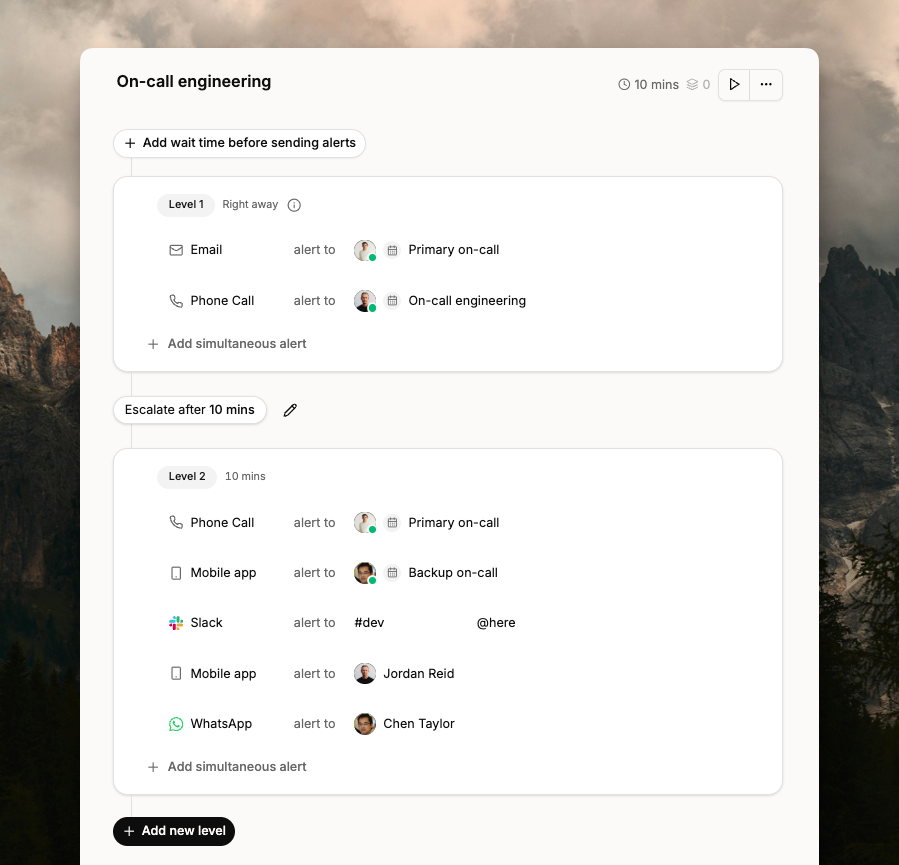
Navigating to the right escalation policy is faster now. Use the left panel to switch between policies. Filter by on-call schedule, user, integration, or number of levels.

Editing is faster too. You can make changes easily. Undo or redo changes at any point, and a full history of edits is available.

Each level now shows how many minutes after trigger it runs, and the total escalation duration.
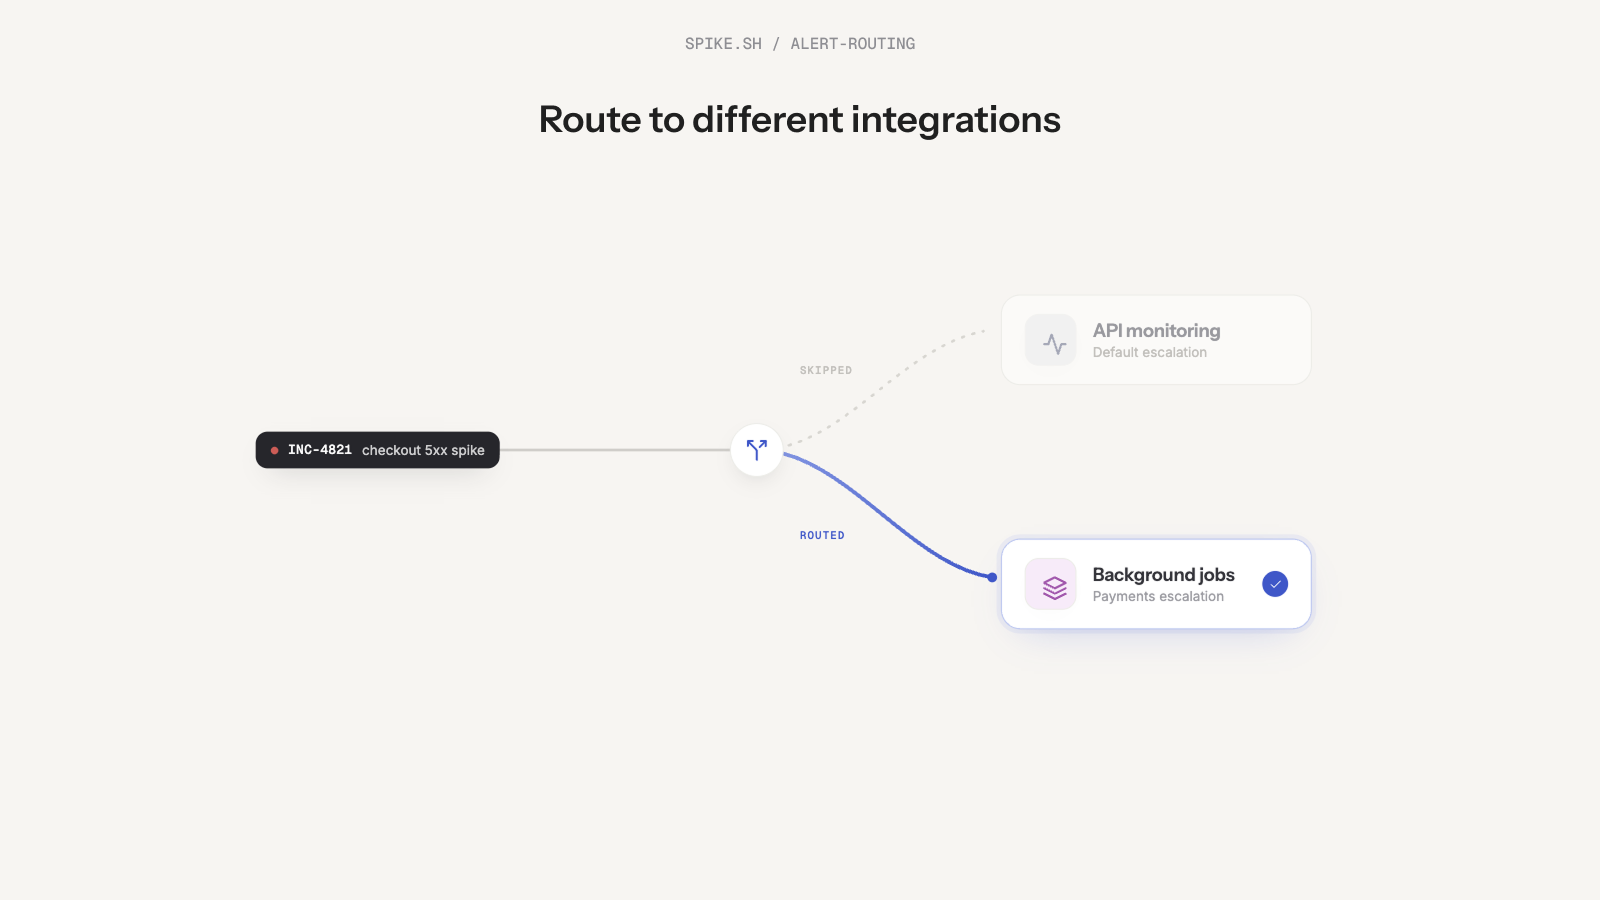
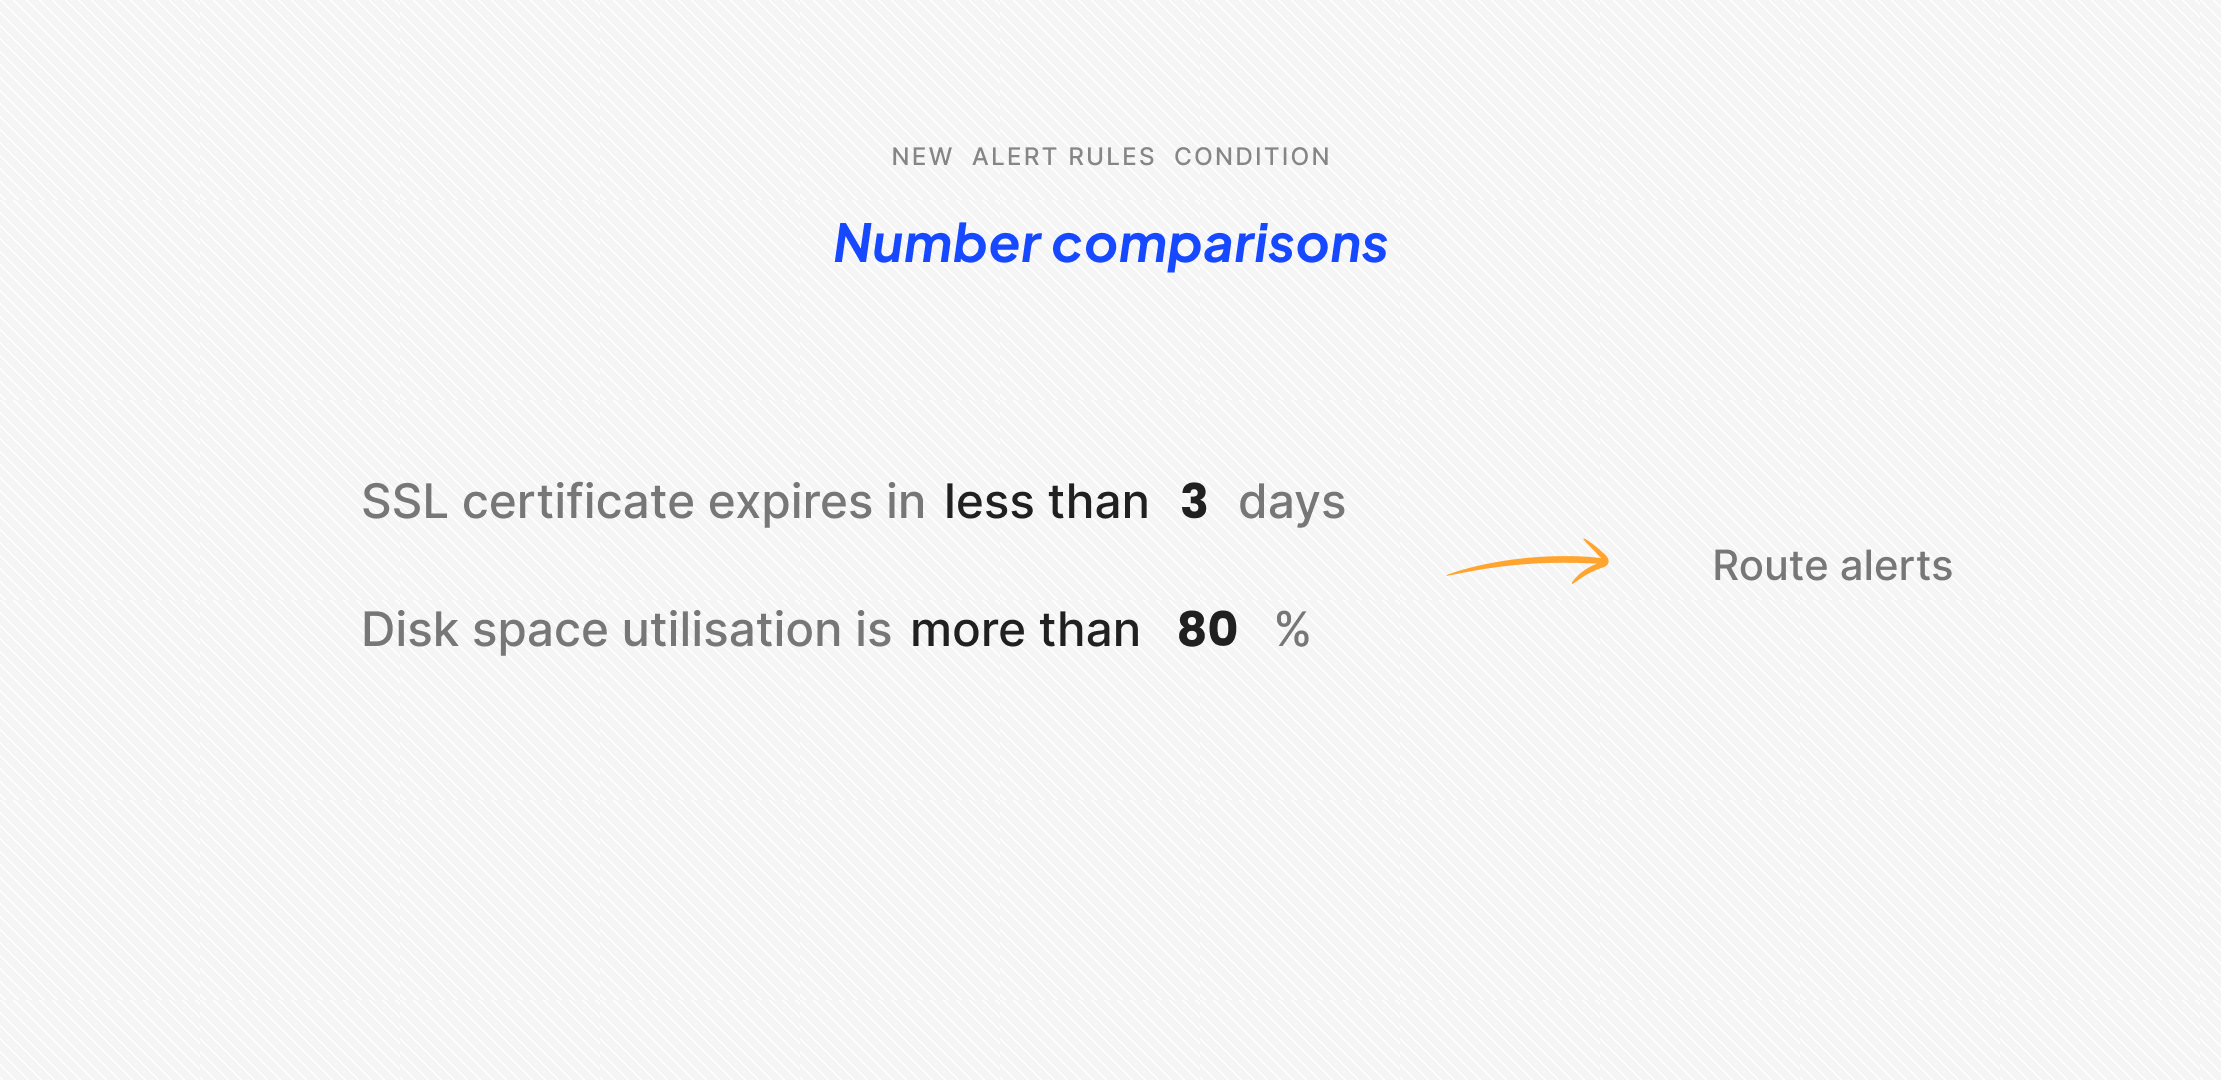
View escalations →


Integrations page

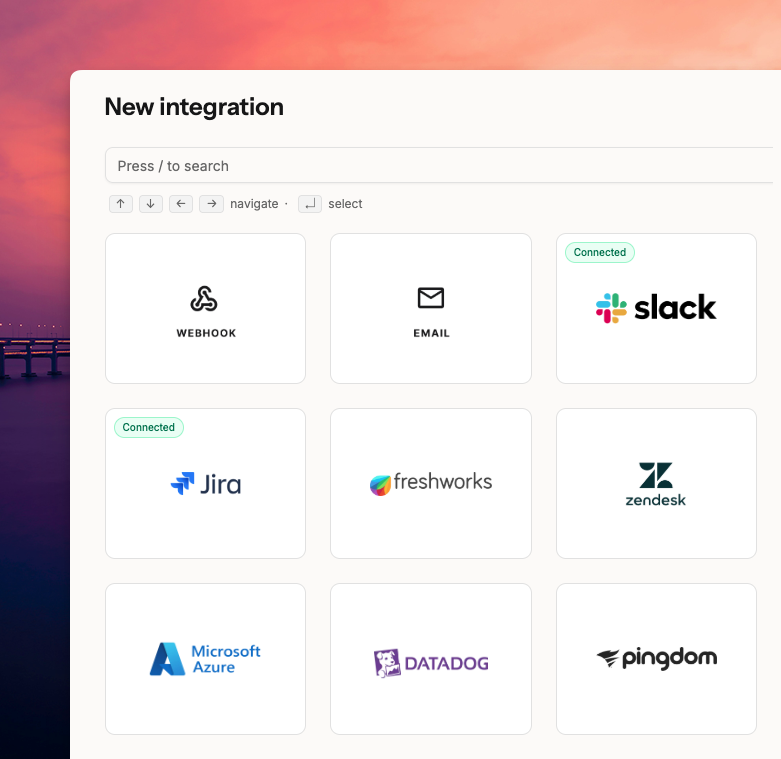
All integrations (Slack, Microsoft Teams, Linear, Jira, Freshdesk, etc) live in one place.

Add incident-triggering sources (like Grafana) and outbound integrations (like Slack) from the same flow.


Teams page

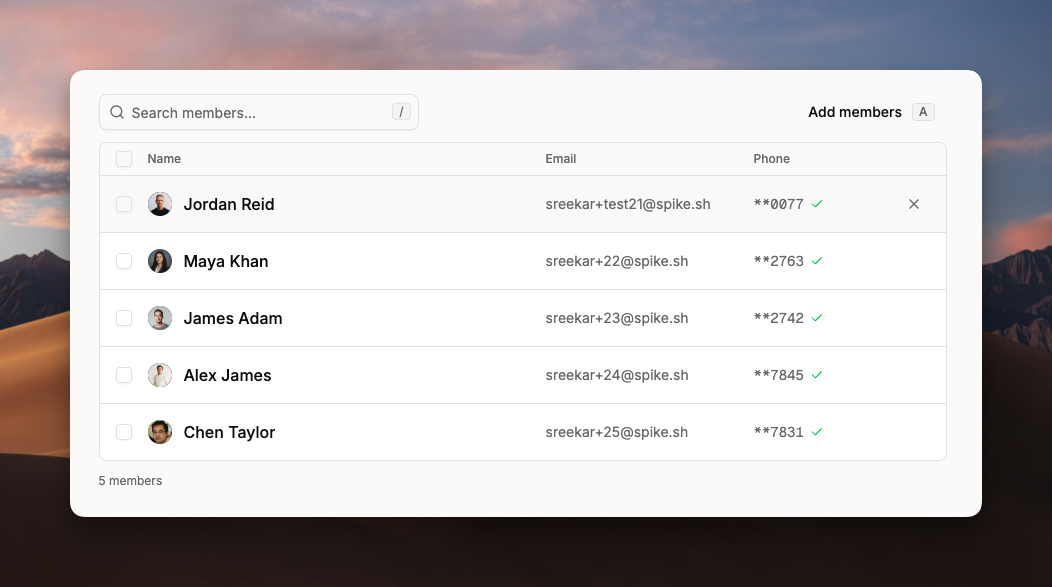
Team management is improved.

  • Filter teams and find what you need faster.
  • Join or move to a team more easily.
  • Move and remove members with fewer steps.

Explore the new Spike →

Route incidents to different integrations

Change integration in Alert Rules

You can now use Change Integration in Alert Routing Rules to automatically route incidents to the right integration and team.

For example, an incident comes in under the API integration. But if its title contains "payments", Spike routes it to the Payments integration and alerts the payments team instead.

This way, the right team always gets paged with the right context. And over time, you can see which integrations receive the most incidents.

Set up Change Integration →

We also added two new routing conditions: Incident suppressed and Incident suppressed within a time window.

You can use these to switch integrations when an incident gets suppressed too many times.

For example, if an incident is suppressed 5 times, Spike can move it from the API integration to the Payments integration and start alerting the right team.

Set up suppression conditions →

Route to other teams

Route to other teams

We added a new action in Alert Routing Rules called Route to other teams.

Now, when an incident comes in, you can automatically route it to the team that owns it.

For example, if Ops team picks up a security incident, you can route it to the Security team instead.

To set it up:

  • Toggle Route to other teams
  • Pick the destination team
  • Save the rule

You can also change the incident’s priority and severity while routing.

Once the incident is routed, the destination team’s escalation policies and alert rules take over, so the right people get alerted based on how that team works.

Route to other teams →

Compare numbers in Alert Rules

Number comparisons in Alert Rules

Alert Rules now support number comparisons under the Incident details condition.

You can choose from:

  • Greater than >
  • Less than <
  • Greater than or equal to >=
  • Less than or equal to <=

With these, you can create rules like setting priority to P1 if the CPU usage percentage is greater than 80. Or load a specific escalation policy if the number of days until SSL expiry is less than 3.

These operators give you more precise control over incident automations. You can triage, route, and run playbooks based on numerical values without manual intervention.

Set up number comparisons →

Learn more →

Better AWS auto-resolution

Better AWS auto-resolution

We updated the AWS integration to auto-resolve more incident types.

Simple Notification Service (SNS) incidents now resolve automatically when the underlying issue clears up. This reduces stale incidents on your dashboard.

You see only what actually needs attention, not incidents that are already fixed. This keeps your incident queue clean and helps your team focus on active issues.

Learn more about AWS integration →

Jenkins integration for CI/CD alerts

Jenkins integration

We now support Jenkins, so you can get alerts from your CI/CD pipelines in Spike.

Connect your Jenkins instance to Spike and route build failures, deployment issues, and test failures to the right team.

When a build breaks, the person on-call gets alerted instantly. This keeps your DevOps team on top of pipeline issues.

Read setup guide →

New Integrations → NinjaOne and Jira Inbound

NinjaOne integration

We now support NinjaOne, so you can monitor your IT infrastructure and get alerts in Spike.

Connect your NinjaOne account to Spike and route device monitoring alerts, endpoint security issues, and system failures to the right team.

This keeps your IT operations team on top of infrastructure issues without switching tools.

Read the setup guide →


Jira Inbound integration

We also launched an inbound integration for Jira.

Now, you can automatically trigger incidents in Spike when Jira issues are created. So, if a bug gets logged in Jira, it instantly alerts the person on-call in Spike.

This keeps your dev and support teams in sync without manual pings.

Read the setup guide →

Introducing a more flexible On-Call schedule

Today, we are introducing some new on-call features: Add Gaps to on-call, Scheduled Layers, Handoff Days, and more. Flexibility in on-call schedules has been the single focus point in this release.

Add Gaps to on-call

Gaps let you insert an empty slot into a rotation. When a gap occurs, the next layer automatically steps in.

For example, you can set up a daily rotation like: Person A → Gap → Person B

You can add as many gaps as you’d like.

Scheduled layers

On-call Layers now support start and end dates.

If you need to set up holiday coverage now that automatically kicks in on December 25th and disappears after New Year's, then you can make that happen!

Every layer now has a "Set duration" option. Spike automatically activates the layer on the start date and deactivates it after the end date. No manual activation needed. Both start and end dates are optional.

Handoff days

You can now choose which day of the week your on-call rotation should switch—every Monday, every Tuesday, and so on. This gives you control over when handoffs happen, instead of tying them to the day the schedule was originally created.

It’s backward compatible as well, so you can add handoff days to your existing schedule.

  • Ready-to-Use Schedule Templates: When creating a new layer, you'll see four pre-built templates: Weekday Layer, Weekend Layer, Night Shift, and Business Hours. Click one, and the time ranges and rotation patterns are already configured.
  • Holiday Calendar Integration: Add your company's holiday calendar to Spike, and holidays display directly on your on-call calendar. This gives you a visual reference while building schedules so you can spot conflicts early. There are plans to bring automation here. Please upvote on our roadmap.

Visit on-calls

× Zoomed Image