
Atlassian is shutting down OpsGenie. New sales stopped on June 4, 2025, and the platform will go offline completely on April 5, 2027.
As an OpsGenie user, you now face a critical decision. Migrate to Jira Service Management (JSM), Atlassian’s recommended path, or choose a purpose-built alternative like Spike.
To help you make a clear choice, I wrote this blog for you. And I didn’t just go through their docs and call it a day; instead, I signed up for both tools and ran a full, hands-on comparison.
I created the same integrations, escalation policies, on-call schedules, and triggered identical alerts on both tools. Then, I reviewed them based on 4 key criteria.
To make things easier, I added a checklist and several summary tables throughout the blog post. They give you a quick overview of the information you need.
Let’s dive in!
Table of Contents
Jira Service Management (JSM) vs. Spike: My Incident Management Criteria
- Alerting: How each tool alerts your team when incidents hit, including setup ease, key channels, and features to reduce alert noise.
- Incident Response: What can you do after an alert fires? I looked into the triage options, team coordination tools, ways to communicate with stakeholders, and post-incident learning.
- On‑Call Management: How quickly can you create and adjust schedules, handle daily edits, and make overrides for last‑minute changes?
- Pricing: What each plan actually includes and what it really costs, including add‑ons, limits, and overall value for your team.
Jira Service Management (JSM) vs. Spike: Incident Management Comparison
| Criteria | JSM | Spike |
|---|---|---|
| Alerting | Dual control over alerts, nested UI for contact methods, Slack requires multiple steps, can’t specify alert delivery method in escalations | Dual control over alerts, straightforward setup, native Pushover support, can specify exact alert delivery method in escalations |
| Incident Response | Strong manual controls, automation via Alert Policies, repeat escalation with customizations, built-in postmortem templates on paid plans | Built-in automation with Alert Rules and Playbooks, relative escalation timing, acknowledge timeout, webhook-based postmortems |
| On-Call Management | Multi-step schedule creation inside teams, multiple timeline views, basic overrides without comments or activity logs | Single-page setup with live preview, ready-to-use templates, one-click cloning, overrides with comments and history |
| Pricing | Starting at $20/user/month (Standard), status pages cost extra ($29-109/month via Statuspage.io), postmortems on Premium+ plans | Starting at $7/user/month, all features included, built-in status pages, no hidden costs |
1. Alerting: JSM vs. Spike
| Criteria | JSM | Spike |
|---|---|---|
| Alerting Philosophy | Dual control, but can’t specify how alerts are delivered in escalation policies | Dual control, plus can specify exactly how alerts are delivered in escalation policies |
| Setup & Configuration | Contact methods nested in UI, Slack requires multiple steps, repeat escalation available with customization | Straightforward setup, native Pushover support, simple Slack configuration, relative timing for escalation steps |
| Alert Channels | Multi-channel alerts, can’t reply to emails to take action, alerts on single Slack channel | Multi-channel alerts, can reply to emails with #ack or #res, alerts on multiple Slack channels |
| On-Call Handoff Notifications | Individual on-call shift notifications only, no team-level visibility or webhook automation | Individual and team-specific Slack/Teams channel notifications, webhook automation for shift changes |
| Alert Fatigue Handling | Built-in deduplication, grouping, suppression, plus Notification Policies and Alert Policies | Built-in deduplication, grouping, suppression, plus Alert Rules with ready-to-use templates and work-life balance features |
Alerting in JSM
JSM carries forward OpsGenie’s dual-control approach. You can set individual notification preferences and create team-level escalation policies. Each escalation step lets you define when to send notifications, time delays, and who to notify.
However, like OpsGenie, you can’t specify how someone gets alerted. You can tell JSM to alert a user, but not whether that alert should be a phone call or SMS. Plus, you need to calculate the delay time from the top of the escalation policy, not relative to each step.
JSM adds repeat escalation with customizations like time delay, maximum repetitions, and automatic alert closure when repeats finish. The interface was nested. It took me some time to find where to add contact methods. Plus, Slack setup requires multiple steps, just like OpsGenie.
Alerting in Spike
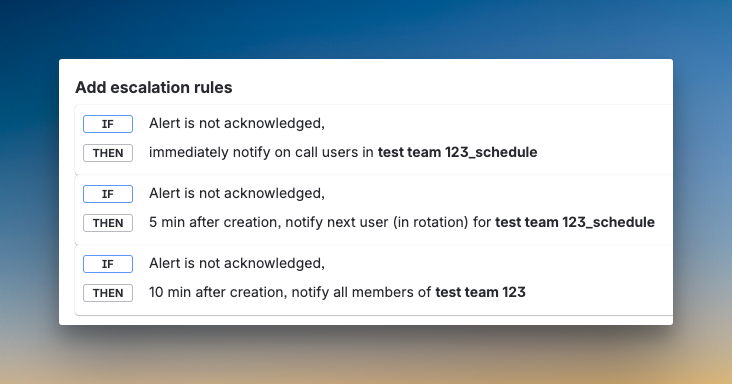
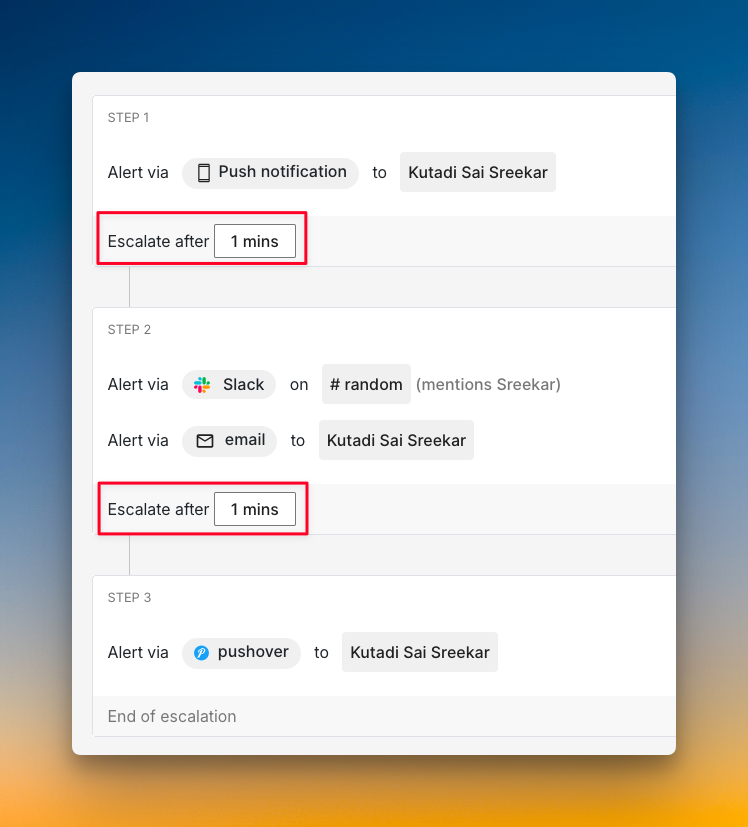
Spike maintains OpsGenie’s dual-control philosophy while adding key improvements. You can create escalation policies that specify exactly how someone gets alerted. For example, you can set up a policy that calls a team member first, then sends SMS if they don’t respond.
At the same time, individual users can set alert overrides. If someone prefers SMS over phone calls, they can configure that without breaking the escalation logic. This gives you both team control and individual flexibility.
Spike simplifies the setup process. Contact methods are easy to find. Native Pushover integration is built in. Escalation timing is relative, meaning you set “escalate after X minutes” for each step instead of calculating from the top like OpsGenie. You can also alert people in specific Slack channels with @here, @channel, or @user mentions.
Who should pick what?
- Pick JSM if you’re comfortable with OpsGenie’s approach, where users control their own alert channels and you need repeat escalation with automatic closure options.
- Pick Spike if you want both team control over how alerts are delivered and individual flexibility to override those settings, plus simpler Slack setup and relative escalation timing.
For a detailed comparison on alerting, read the blog: JSM vs. Spike: Alerting
2. Incident Response: JSM vs. Spike
| Criteria | JSM | Spike |
|---|---|---|
| Initial Response | Manual controls, automation via Alert Policies, top-down escalation timing | Built-in automation with Alert Rules, relative escalation timing, Acknowledge Timeout and Resolved by Timer feature |
| Team Collaboration | Zoom/Teams war rooms, bi-directional Jira sync, automatic Slack channels | One-click Google Meet war rooms, simpler ticketing for Jira/Linear/ClickUp |
| Incident Communication | Requires paid Statuspage.io integration, manual status updates | Built-in status pages, SEO controls, automatic updates via Playbooks |
| Post-Incident Actions | Unified activity log, built-in postmortem templates on paid plans | Unified timeline, webhook-based postmortems for any documentation tool |
Incident Response in JSM
JSM maintains the OpsGenie approach to manual triage. You can update priority from Slack or the dashboard. For automatic triage, JSM gives you Alert Policies, similar to OpsGenie’s Policies feature.
You can acknowledge alerts from all channels except email. Auto-acknowledge is possible through Alert Processing Rules or Automation. JSM offers instant war room buttons for Zoom and Teams on the incident dashboard. It also maintains OpsGenie’s strong bi-directional sync with Jira.
JSM does not have a built-in status page. You need to integrate with Atlassian’s Statuspage.io, which costs an additional $29-109/month on top of your JSM subscription. For postmortems, JSM provides built-in templates on Premium and Enterprise plans, whereas OpsGenie only offers them on Enterprise.

Incident Response in Spike
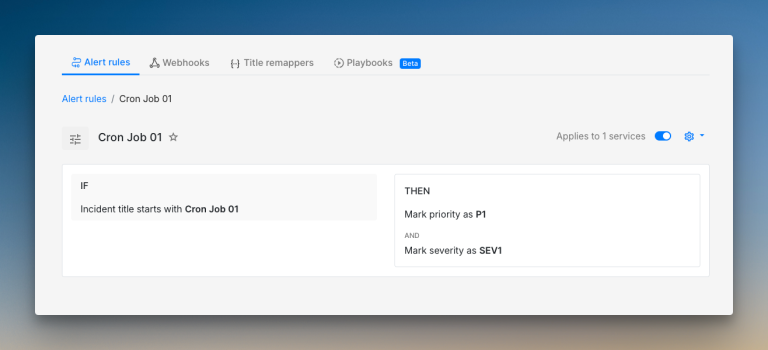
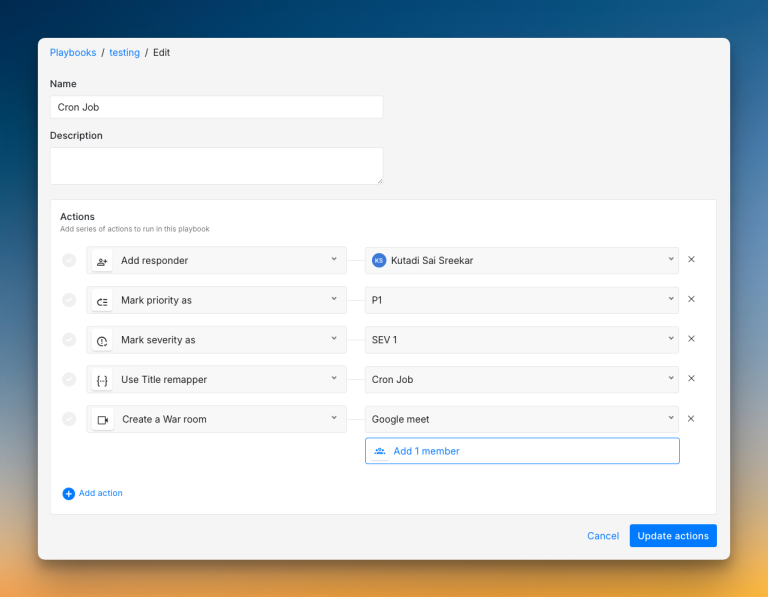
Spike builds automation into its core with Alert Rules. Like OpsGenie’s Policies, you can create if/else logic to auto-triage, acknowledge, or resolve incidents. Playbooks help trigger pre-defined actions to standardize your response.
You can acknowledge from all alert channels, even email. Spike adds an Acknowledge Timeout, which OpsGenie lacks. Plus, Spike’s Resolved by Timer feature automatically resolves incidents after a set period. This prevents stale incidents from cluttering your dashboard.
Spike has built-in status pages at no extra cost. Creating one is easy, and you get a live preview as you build. You can set up Playbooks to send automatic notifications through outbound webhooks when incidents occur or get resolved. For postmortems, Spike uses webhooks to send all incident data to your own documentation tools, like Notion.
Who should pick what?
- Pick JSM if you need bi-directional Jira sync, built-in postmortem templates, and prefer Zoom or Teams for war rooms with instant buttons on the dashboard.
- Pick Spike if you want built-in automation with Alert Rules and Playbooks, relative escalation timing, built-in status pages with deep customization, and flexibility to export incident data to your team’s favorite documentation tools.
For a detailed comparison on Incident Response, read the blog: JSM vs. Spike: Incident Response
3. On-Call Management
| Criteria | JSM | Spike |
|---|---|---|
| On-Call Schedule Creation | Multi-step process inside teams, preview on the side with 3 separate tabs (Base, Override, Final), no templates | Single-page setup with live preview on the side, ready-to-use templates available |
| On-Call Flexibility | Can edit, duplicate, and delete schedules and rotations, no instant add-layer button, no favorites | One-click cloning, star schedules as favorites, instant add-layer button |
| On-Call Dashboard & Visibility | Multiple timeline views (1 day, 1 week, 2 weeks, 1 month) and calendar view, no activity logs | List view and calendar view, complete activity logs and separate override history for each schedule |
| On-Call Override Functionality | Basic overrides with “Take on-call for an hour” button, no comments or history tracking | Overrides with comments for context, separate override history, work modes like Out of Office and Cooldown |
On-Call Management in JSM
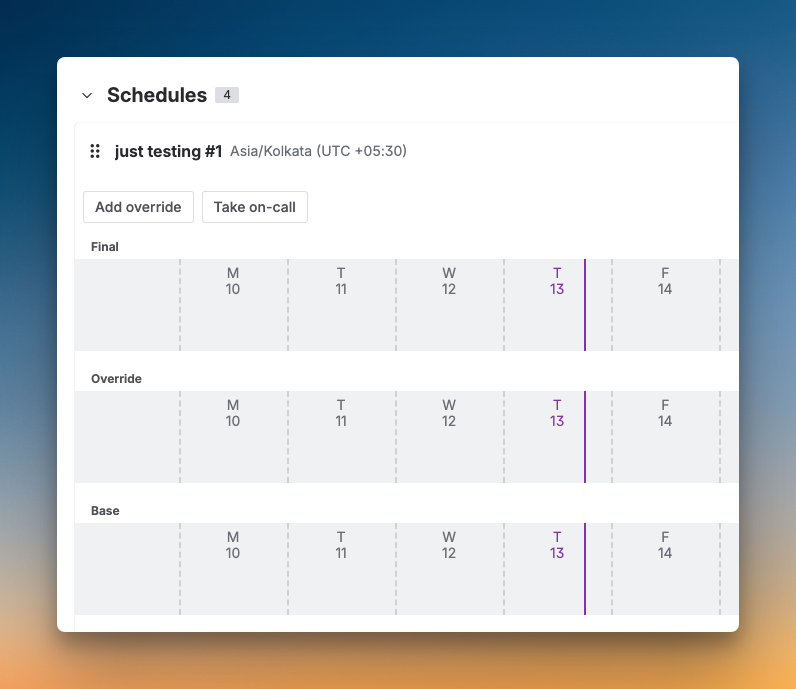
JSM takes the same team-based approach as OpsGenie. You first add a team, then build an on-call schedule within that team. The process has three steps: add members, configure rotations, and set start times.
The interface nests schedule options inside team menus. You get three preview tabs: Base shows rotations, Override shows temporary changes, and Final combines both. JSM offers multiple timeline views: one day, one week, two weeks, and one month, plus a calendar view.
JSM does not track on-call actions. When you create a schedule, add rotations, or make overrides, nothing gets logged. You also can’t add comments to overrides. This makes it hard to see why coverage changed or who made the adjustment.
On-Call Management in Spike
Spike puts schedule creation on a single page. A live calendar preview sits right beside your settings and updates as you build. Ready-to-use on-call templates help you create schedules fast, similar to how OpsGenie made setup quick.
You can clone entire schedules with one click. Star your most-used schedules to see them in your sidebar. Add new layers instantly without opening extra menus. Spike also offers Out of Office and Cooldown modes that hand over all your on-call duties automatically.
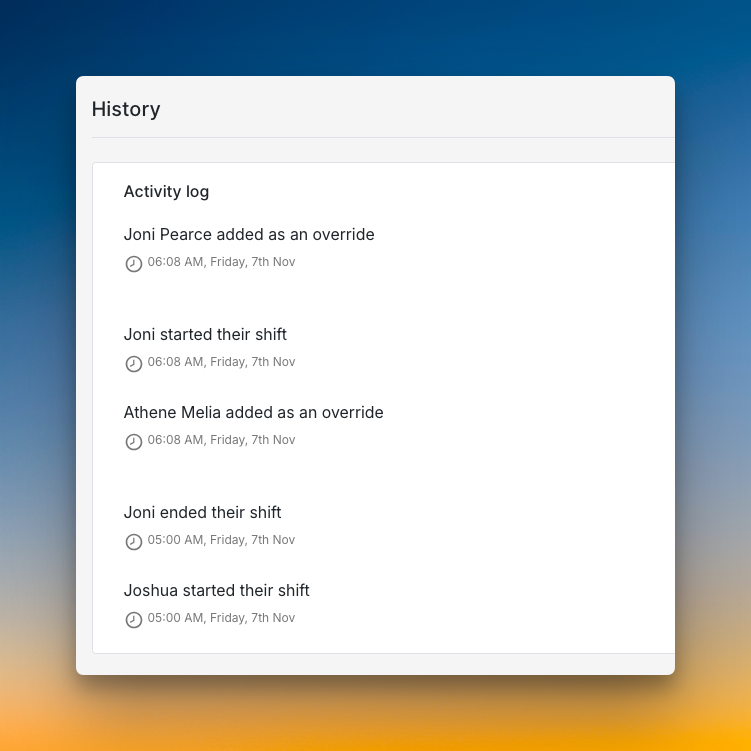
The dashboard shows all schedules in list or calendar view. List view displays the schedule name, member count, and who’s on call now. Calendar view shows your full month of coverage across every schedule. Spike logs all actions and keeps a separate override history for each schedule. You can add comments to every override for context.
Who should pick what?
- Pick JSM if you want three separate preview tabs, multiple timeline views for coverage, and don’t need activity tracking or override comments.
- Pick Spike if you want fast setup with templates, one-click cloning, instant layer additions, work modes for time off, and a complete audit trail with comments on every override.
For a detailed comparison on On-Call Management, read the blog: JSM vs. Spike: On-Call Management
4. Pricing: JSM vs. Spike
| Criteria | JSM | Spike |
|---|---|---|
| Pricing Model | Tiered plans with extra costs for key features | Simple, all-inclusive plans |
| Starting Price | $20/user/month (Standard) | $7/user/month (Starter) |
| Core Features | Status pages cost extra ($29+/month). Postmortems on Premium plan. | All features are in all plans, including status pages. |
| Hidden Costs | Yes, for status pages and advanced features. | None. What you see is what you pay. |
Pricing in JSM
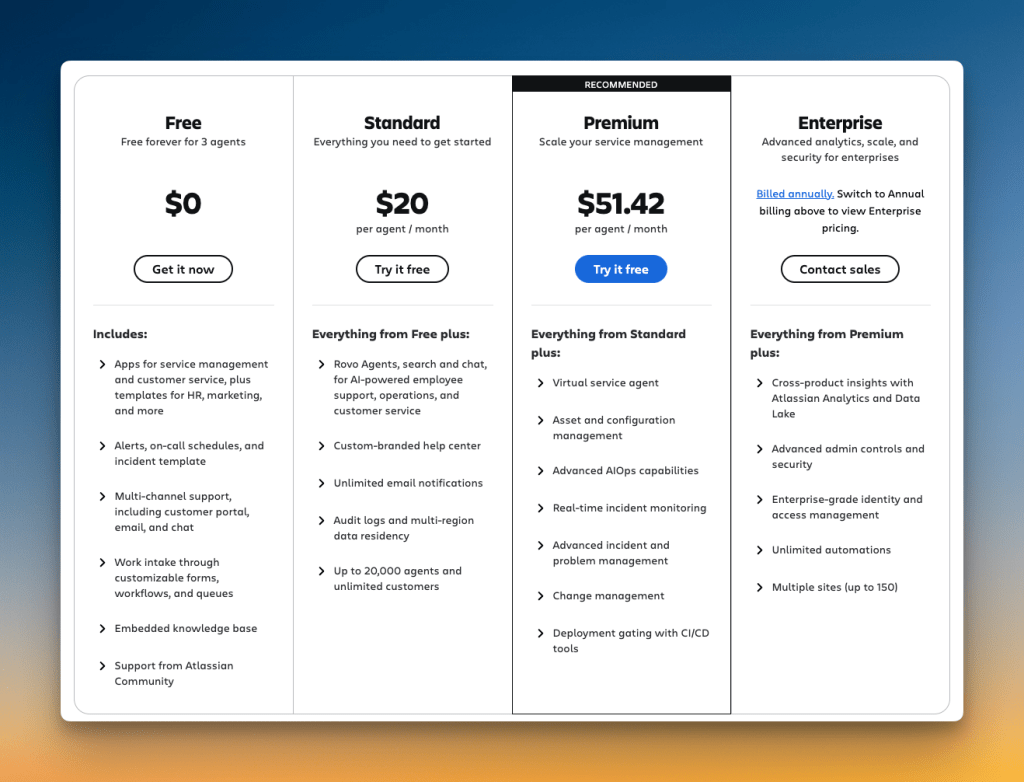
JSM’s pricing starts at $20 per user each month for its Standard plan. This plan is part of a larger service desk tool, not just for incident management.
You will pay extra for key features. For example, status pages require a separate Statuspage.io subscription. That adds another $29 to $109 each month to your bill.
Postmortems are also only on higher tiers. You need the Premium plan ($51.42 per user) or the Enterprise to get them. This pricing model is more complex than what most OpsGenie users are used to.
Pricing in Spike
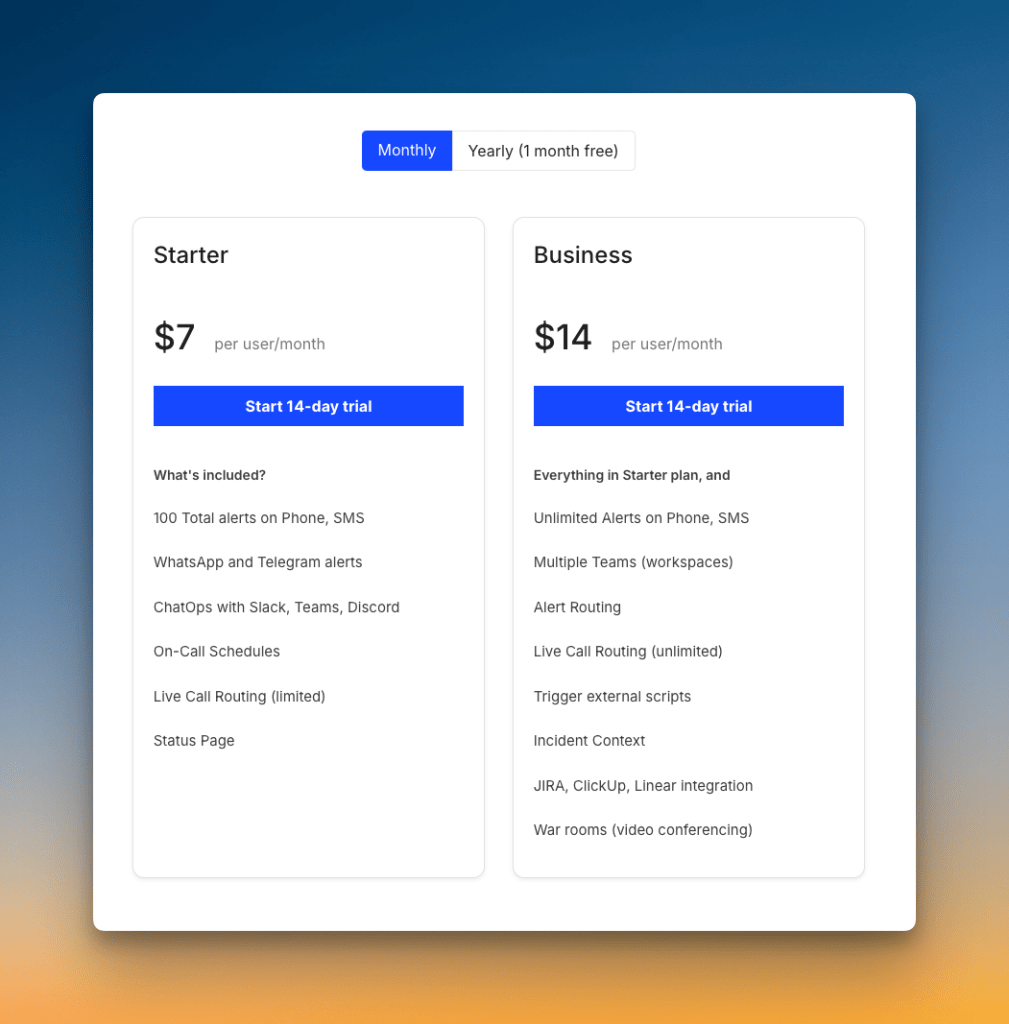
Spike offers simpler, all-inclusive pricing. The Starter plan costs $7 per user each month. The Business plan costs $14 per user each month.
All core incident management features are included in every plan. This covers phone calls, on-call schedules, integrations, and status pages. There are no feature gates for these tools.
The price you see is the price you pay. There are no surprise charges for essential features. OpsGenie users will find this transparent model a refreshing change.
Who should pick what?
- Pick JSM if you are deeply invested in the Atlassian ecosystem and don’t mind paying extra for status pages and advanced features on higher-tier plans.
- Pick Spike if you want straightforward pricing where all features are included from the start. It is a great choice for teams that want quick, simple onboarding without hidden fees.
With OpsGenie shutting down, businesses are switching to Spike with 50% off. Learn more →
Jira Service Management (JSM) vs. Spike: Incident Management Checklist
The four criteria above cover the major decision points. But real-world incident management often comes down to specific capabilities that matter during high-pressure moments.
This 15-point checklist shows which tool supports what. Use it to spot the features that matter most to your team.
| Checklist Item | JSM | Spike |
|---|---|---|
| Dual control over alerts (team and individual) | ✅ | ✅ |
| Time-based escalations (business hours, off-hours) | ✅ | ✅ |
| Auto-skip unavailable on-call responders | ✅ | ✅ |
| DND/silence bypass for critical alerts | ✅ | ✅ |
| Acknowledge/resolve from chat apps (Slack, Teams) | ✅ | ✅ |
| Automatic alert deduplication and grouping | ✅ | ✅ |
| Trigger incidents from incoming emails | ✅ | ✅ |
| Channel-specific escalation rules (e.g. phone vs SMS) | ❌ | ✅ |
| Bi-directional Jira sync | ✅ | ❌ |
| Ready-to-use templates (escalations, alert rules) | ❌ | ✅ |
| Built-in postmortem templates | ✅ | ❌ |
| Acknowledge/resolve by replying to email | ❌ | ✅ |
| Multiple timeline views for schedule coverage | ✅ | ❌ |
| Built-in status pages at no extra cost | ❌ | ✅ |
| Activity logs for on-call schedule changes | ❌ | ✅ |
Final Thoughts
Both JSM and Spike handle core incident management functions. They both keep the key OpsGenie features you rely on. This includes dual-control alerting, on-call schedules, and escalation policies.
JSM is Atlassian’s official migration path. It makes sense if you use Jira heavily and want everything in one place. You get bi-directional Jira sync, built-in postmortems, and Zoom/Teams war rooms. But status pages and other key features cost extra.
Spike offers a more flexible path forward. It keeps what you loved about OpsGenie and adds smart improvements. You get channel-specific escalations, email-based actions, built-in status pages, and powerful automation—all at a better price.
OpsGenie shuts down completely by April 2027. Now is the time to test your options and migrate on your own terms. This gives you control, so you don’t have to rush at the last minute.
If you want a modern tool that simplifies incident management without the extra costs, Spike is the clear choice.