
Atlassian is sunsetting OpsGenie. New sales already stopped on June 4, 2025, and the platform will be completely shut down on April 5, 2027.
As an OpsGenie user, you now face a critical decision: Migrate to Jira Service Management (JSM), Atlassian’s recommended path, or choose a purpose-built alternative like Spike.
I wrote this blog post to end your confusion and help you make a clear choice. And to write this blog, I created an integration on both the tools, set up alert channels, triggered identical alerts, and ran a full, hands-on comparison.
This detailed analysis will show you the key differences between Jira Service Management (JSM) vs. Spike, and give you the confidence to pick the right tool for your team.
Table of Contents
Jira Service Management (JSM) vs. Spike: My Evaluation Criteria for Alerting
- Control Over Alerts: I looked at how each platform provides control over alerting. Does it offer only individual-level control, only team-level control, or both?
- Setup and Configuration: This covers getting started. How fast can you add contact methods, create a service, connect an integration, and design an escalation policy?
- Alert Channels: I compared key channels like phone calls, SMS, email, push, and Slack. How rich is the information in each alert? What actions can you take directly from an alert?
- On-Call Handoff Notifications: This focuses on notifications for on-call shift changes. I checked how easy and flexible it is to get notifications when your on-call duty starts or ends.
- Alert Fatigue Handling: This is about cutting down on noise. I looked at what options each tool provides to help prevent team burnout.
Jira Service Management (JSM) vs. Spike: Alerting Comparison
| Criteria | JSM | Spike |
|---|---|---|
| Control Over Alerts | Dual control: Both team and individual-level alert customization, but can’t specify how alerts are delivered in escalation policies | Dual control: Both team and individual-level alert customization, plus can specify exactly how alerts are delivered in escalation policies |
| Setup and Configuration | Contact methods nested in UI, Slack requires multiple steps, and repeat escalation available with customization | Straightforward setup, native Pushover support, simple Slack configuration, and relative timing for escalation steps |
| Alert Channels | Multi-channel alerts with phone, SMS, email, push, and Slack. Can’t reply to emails to take action. Alerts on single Slack channel | Multi-channel alerts with phone, SMS, email, push, and Slack. Can reply to emails with #ack or #res. Alerts on multiple Slack channels |
| On-Call Handoff Notifications | Individual on-call shift notifications only. No team-level visibility or webhook automation | Individual and team-specific Slack/Teams channel notifications. Webhook automation for shift changes |
| Alert Fatigue Handling | Built-in deduplication, grouping, suppression, plus Notification Policies and Alert Policies | Built-in deduplication, grouping, suppression, plus Alert Rules with ready-to-use templates and work-life balance features |
1. Control Over Alerts: JSM vs. Spike
Alert Control in JSM
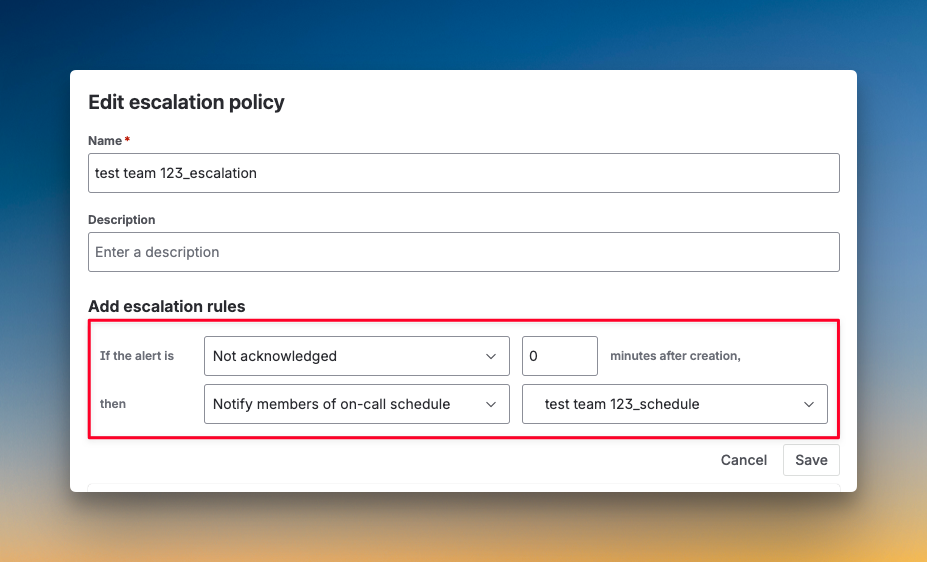
Like OpsGenie, JSM gives you dual control over alerts. You can set individual notification preferences and create team-level escalation policies. Each escalation step lets you define when to send notifications, time delays, and who to notify.
However, you can’t specify how someone gets alerted. You can tell JSM to alert a user, but not whether that alert should be a phone call or SMS. That decision lives in the user’s personal notification settings, just like in OpsGenie.
Alert Control in Spike
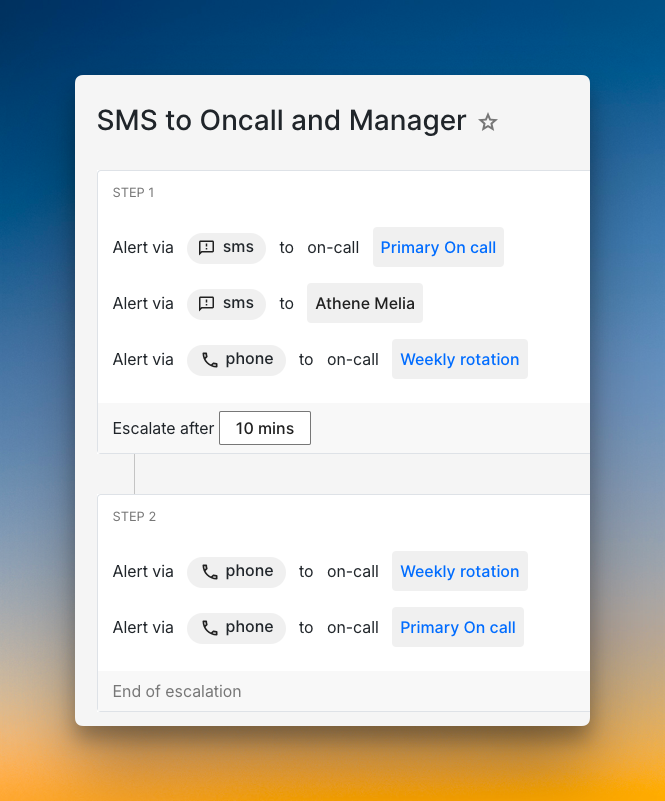
Spike also offers dual control over alerts, but with a key difference. You can create escalation policies that specify exactly how someone gets alerted. For example, you can set up a policy that calls a team member first, then sends SMS if they don’t respond.
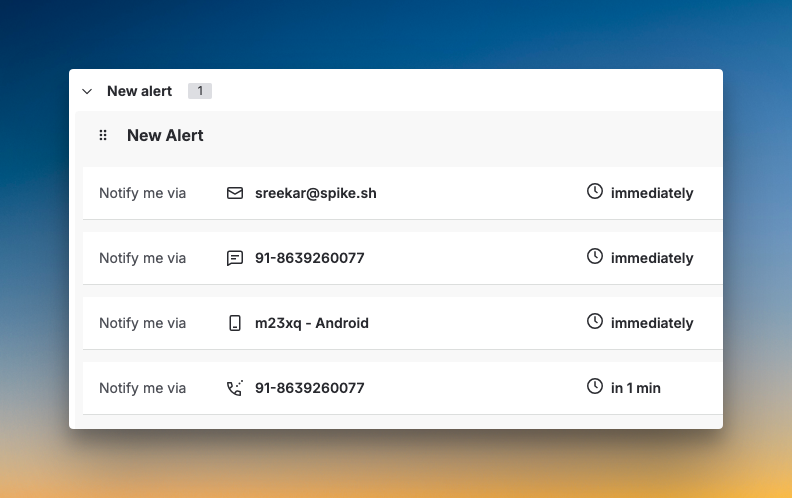
At the same time, individual users can set alert overrides. If someone prefers SMS over phone calls, they can configure that without breaking the escalation logic.
Who should pick what?
- Pick JSM if you’re comfortable with OpsGenie’s approach, where users control their own alert channels and don’t need team-level customization of delivery methods.
- Pick Spike if you want both team control over how alerts are delivered and individual flexibility to override those settings.
2. Setup and Configuration: JSM vs. Spike
Setup & Configuration in JSM
JSM follows the same contact method setup as OpsGenie. You add email, phone numbers for calls and SMS, and mobile push notifications. The interface feels nested. It took me some time to find where to add contact methods.
Slack setup requires multiple steps, like OpsGenie. You go to Teams, select your team, add integration, choose Slack, then pick a channel. It’s not as direct as adding an email or phone number. JSM does let you hide contact methods from non-admins, which OpsGenie doesn’t offer.
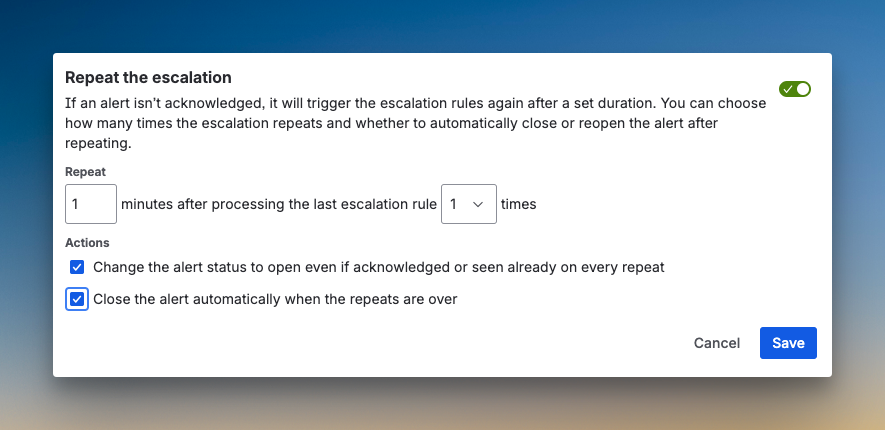
Service and integration setup work the same as OpsGenie. For escalation policies, JSM gives you more options than OpsGenie. You can notify the next member on rotation, the previous member, or a random team member. JSM also adds repeat escalation with customizations like time delay, maximum repetitions, and automatic alert closure when repeats finish.
Setup & Configuration in Spike
Spike covers the same contact methods but simplifies the process. You add phone, SMS, email, Slack, and push notifications. Spike has native Pushover integration built in. You can also customize the phone call voice for gender and speed.
Creating a service is straightforward. I set up a Cron Jobs service and connected it to Healthchecks.io. During integration setup, Spike lets you configure title remapping, acknowledge timeout, and repeat escalation right away. No extra steps needed.
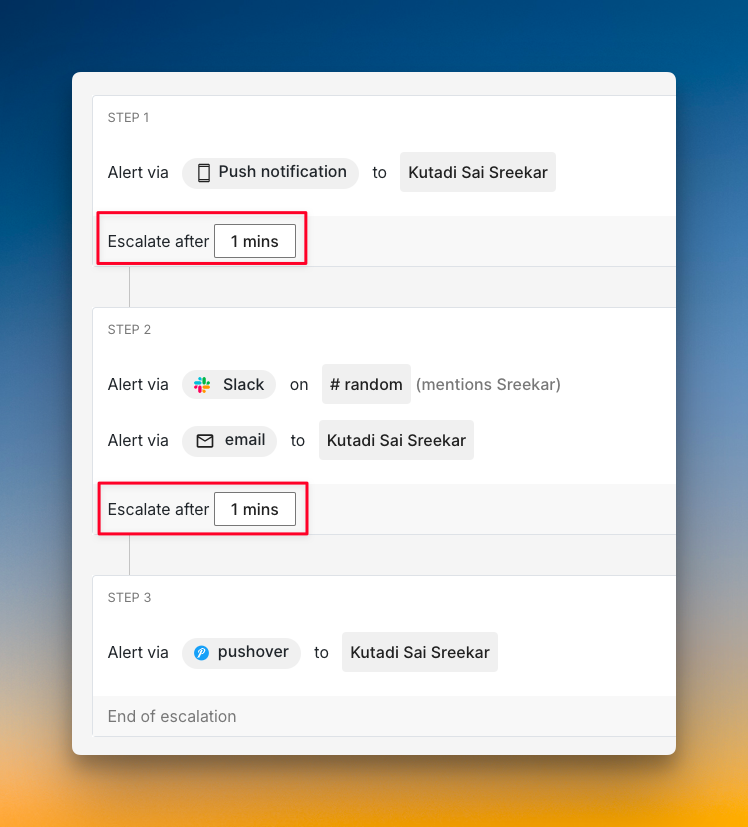
Unlike OpsGenie and JSM, where you calculate delay time from the top, Spike uses relative timing in escalation policies. You just set “escalate after X minutes” for each step. You can also alert people in specific Slack channels with @here, @channel, or @user mentions.
Who should pick what?
- Pick JSM if you’re already familiar with OpsGenie’s nested setup flow and want the extra notify options like next/previous member on rotation.
- Pick Spike if you want a simpler setup, native Pushover support, and relative timing for escalation steps.
With OpsGenie shutting down, businesses are switching to Spike with 50% off. Learn more →
3. Alert Channels: JSM vs. Spike
Alert Channels in JSM
JSM delivers alerts across all standard channels: phone, SMS, email, mobile push, and Slack. Phone call alerts reveal the alert title. You get dial pad options to hear the description, close the alert, acknowledge it, or escalate.
SMS messages include the alert title, a link to the alert, and the alert ID. You can acknowledge by replying with ack [alert id] or resolve by replying with res [alert id].
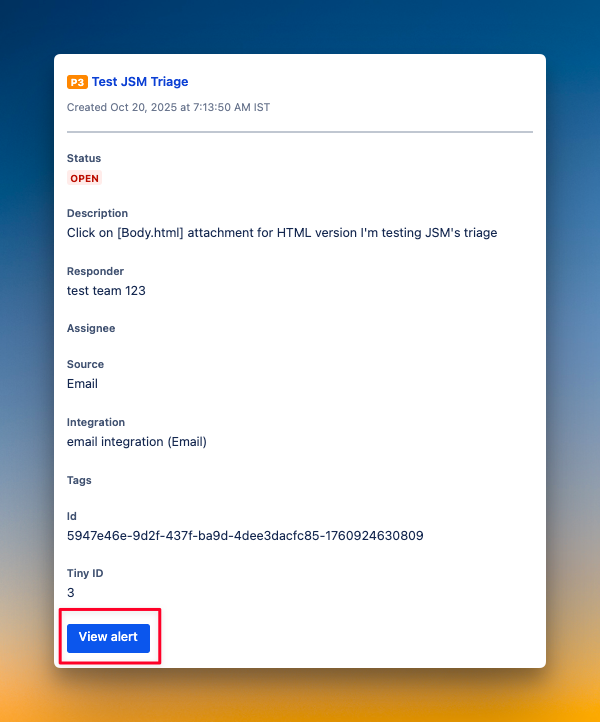
Email alerts show priority, title, status, description, responder, assignee, source, integration, tags, and alert IDs. You see a button to view the alert. However, you can’t acknowledge or resolve it by replying to the email.
Slack alerts display title, status, responders, description, and priority. You can acknowledge, add notes, assign ownership, snooze, add tags, and update priority directly from Slack. With JSM, you can configure alerts to go to only one specific Slack channel.
Alert Channels in Spike
Spike covers the same alert channels. Phone calls show actions on the screen like acknowledge, resolve, and escalate along with the contact. When you answer, you hear a voice you configured earlier that tells you about the alert and your options.
SMS includes incident-triggered time, title, severity, priority, and a link. You can reply to the message to acknowledge, resolve, or escalate the alert. This saves you from opening the app.
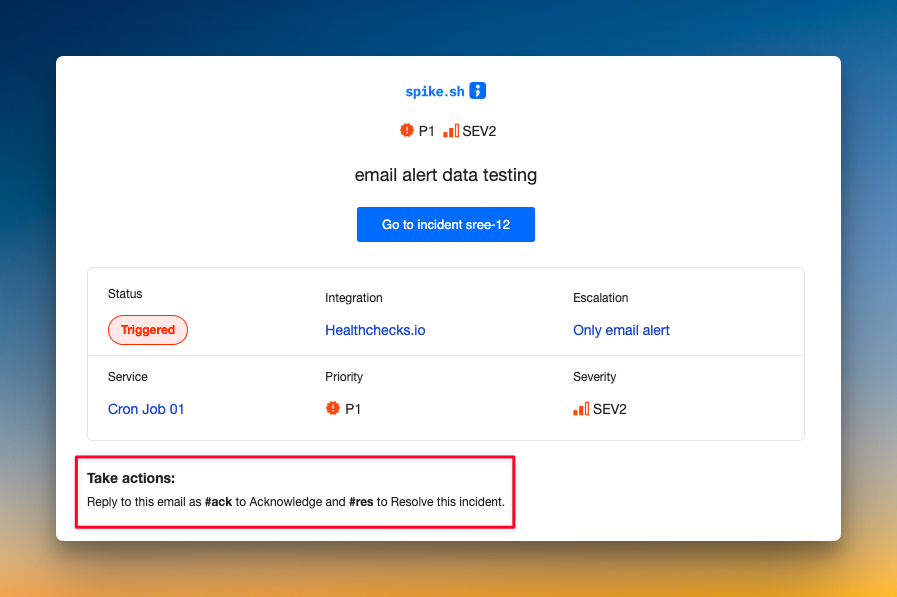
Email alerts include incident title, status, integration, escalation, service, priority, and severity. The key difference from OpsGenie and JSM: You can acknowledge or resolve by replying with #ack or #res. No need to click a link or open a dashboard.
Slack alerts can mention @here, @channel, or @specific users. You see the incident title, responder, links, and integration. You can acknowledge, resolve, escalate, or create a discussion channel instantly. Unlike JSM and OpsGenie, Spike lets you send alerts to different Slack channels, which you can specify in the escalation policy.
Who should pick what?
- Pick JSM if you want to send alerts to a single, dedicated Slack channel and prefer clicking buttons in emails to take action.
- Pick Spike if you want to route alerts to different Slack channels based on the incident and prefer acting on alerts by replying to emails.
4. On-Call Handoff Notifications
On-Call Handoff Notifications in JSM
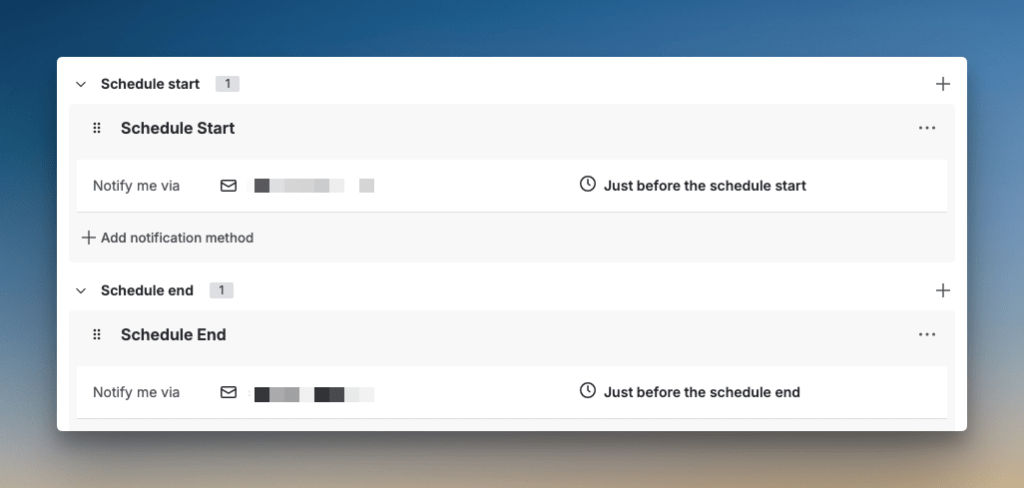
JSM handles on-call shift notifications by sending them to individual users based on their personal notification preferences. You set up notification rules for when your schedule starts or ends. These go to your configured channels like email, SMS, or push.
This approach works at the individual level. JSM sends one notification per user when their shift starts or ends. If you have 10 people on rotation, each person gets their own personal notification. You can’t route these to specific Slack or Teams channels for different teams.
In OpsGenie, on-call handoff notifications work the same way. JSM carries this forward without much change. It’s functional but lacks team-level visibility and automation options.
On-Call Handoff Notifications in Spike
Spike gives you both options. You can send on-call shift notifications to individual users through their configured alert channels, just like OpsGenie and JSM.
Also, you can send on-call shift notifications to specific Slack or Teams channels for each schedule. Backend notifications go to #backend-oncall, and frontend to #frontend-oncall. Each team sees only their shift changes. You can add multiple channels to one schedule if needed.
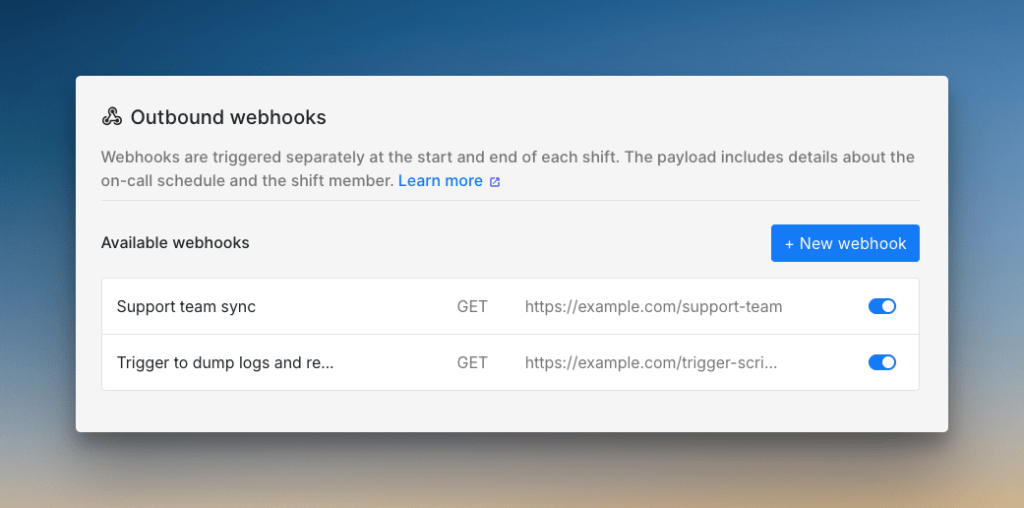
Spike also supports webhook triggers when shifts change. When shifts start or end, Spike sends a GET, POST, or PUT request to your webhook with shift details. With this, you can automate tasks like running health checks, creating tickets, sending SMS alerts, or granting database access when on-call rotations update.
Who should pick what?
- Pick JSM if you only need individual on-call shift notifications sent to personal alert channels
- Pick Spike if you want both individual notifications and team-specific Slack or Teams channels, plus webhook automation for your on-call workflows
5. Alert Fatigue Handling
Alert Fatigue Handling in JSM
JSM handles alert fatigue the same way OpsGenie does. You get automatic deduplication through alias fields, grouping through tags and routing, and suppression through integration rules.
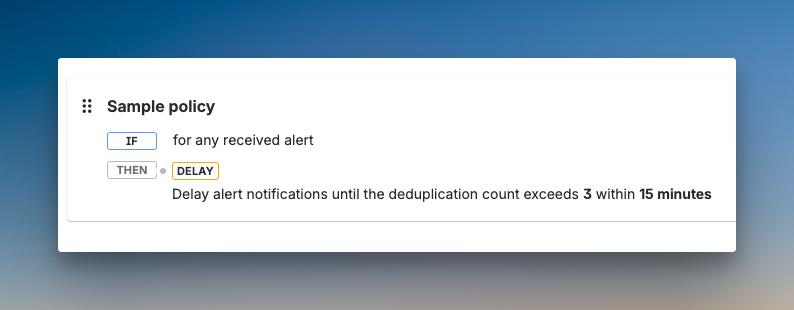
JSM adds Notification Policies, where you can delay or turn off alerts based on time or deduplication count. You can also use Alert Policies to decide which alerts get created in the first place. This gives you another way to suppress unnecessary alerts.
Alert Fatigue Handling in Spike
Spike covers the same ground as OpsGenie and JSM with built-in deduplication, grouping, and suppression. You get these tools as part of the core platform without needing any add-ons or complex policy setups.
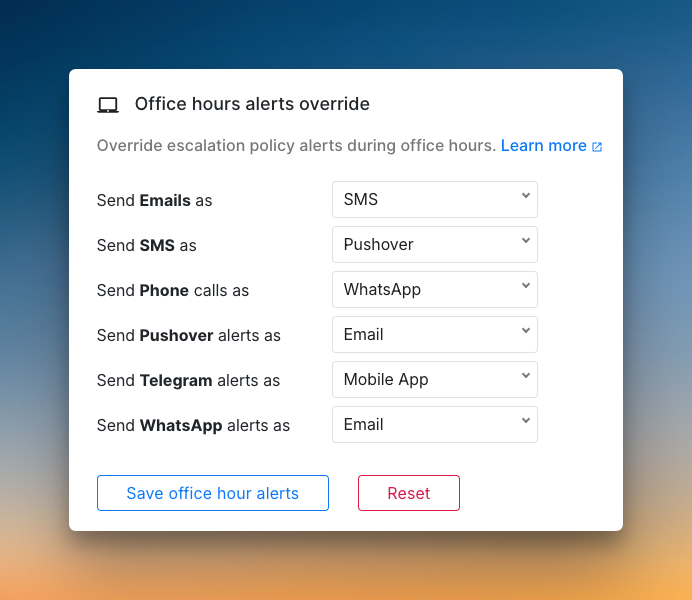
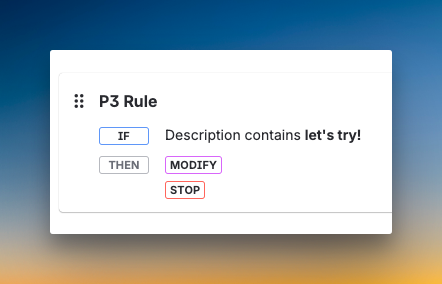
Where Spike goes further is with Alert Rules. This feature lets you create custom logic to control alerts before they reach your team. You can route alerts based on business hours, priority, severity, or time of day. Ready-to-use Alert Rule templates help you get started quickly.
With Spike, you also get work-life balance features like Cooldown mode and Out of Office. These help prevent burnout without complex configuration.

Who should pick what?
- Pick JSM if you want to stick with OpsGenie’s alert fatigue approach and don’t need ready-to-use templates or work-life balance features
- Pick Spike if you want OpsGenie’s core features plus more flexible alert routing with templates and built-in work-life balance tools at no extra cost
Jira Service Management (JSM) vs. Spike: Alerting Checklist
I’ve covered the big questions, but when it comes to alerting, some small details can make or break your experience.
Here’s a 10-point checklist comparing both tools side by side so you know exactly what you’re getting.
| Criteria | JSM | Spike |
|---|---|---|
| Ready-to-use escalation and alert rule templates | ❌ | ✅ |
| Alert title or payload rewriting/remapping | ✅ | ✅ |
| Time-based escalations (business hours, off-hours) | ✅ | ✅ |
| Channel-specific escalation rules (e.g. phone for primary, push for secondary) | ❌ | ✅ |
| Auto-skip unavailable on-call responders (overrides, vacation, out of office) | ✅ | ✅ |
| DND/silence bypass for only critical alerts | ✅ | ✅ |
| Native WhatsApp/Telegram alerting with two-way acknowledgment | ❌ | ✅ |
| Acknowledge/resolve/comment from chat apps (Slack, Teams) | ✅ | ✅ |
| Hide contact methods from non-admins | ✅ | ❌ |
| Multiple phone calls with redial | ✅ | ✅ |
Final Thoughts
Both JSM and Spike handle core alerting functions you know from OpsGenie.
JSM is Atlassian’s official migration path, and it makes sense if you use Jira extensively and want everything under one roof.
Spike offers a more flexible, purpose-built path forward. You get channel-specific escalation, reply-to-email actions, and webhook automation. It keeps what you loved about OpsGenie and adds smart improvements.
With OpsGenie shutting down completely by April 2027, now is the time to test your options. This lets you migrate on your own terms. And if you want a flexible tool that simplifies alerting, Spike is worth a look.